
From Door to DIY Desk!
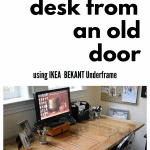
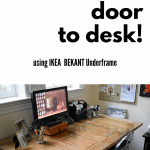
Step-by-Step directions how we made this DIY Desk from an old, salvaged door.
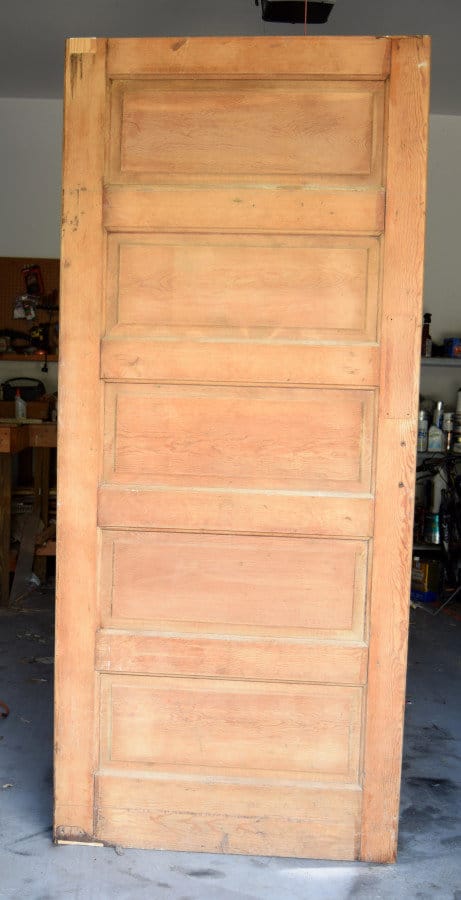
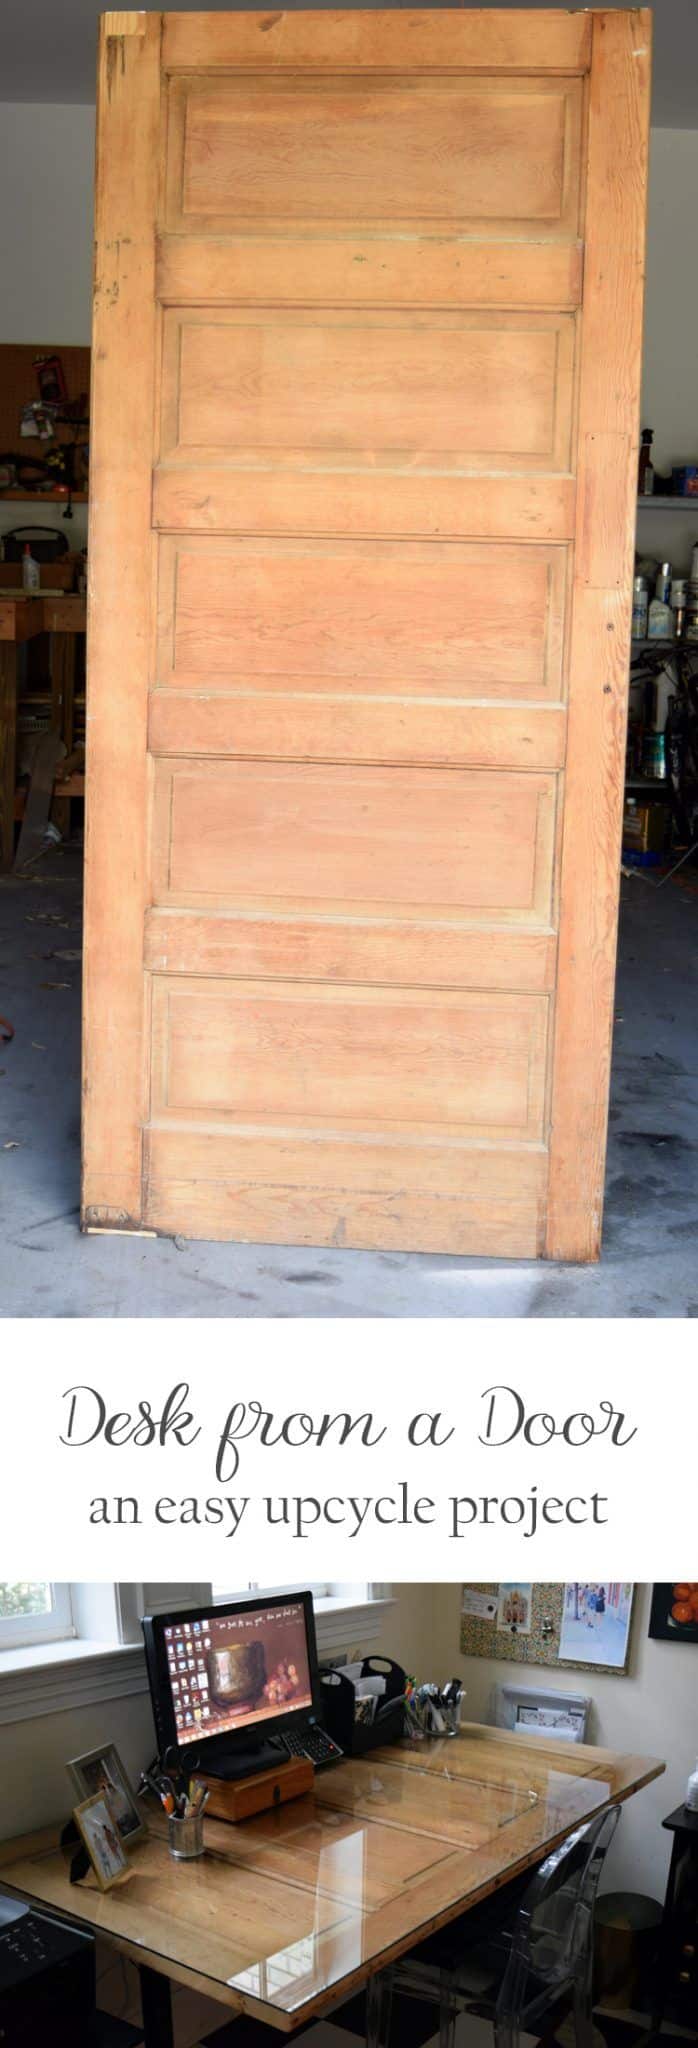
When we were building our home 12 years ago, Terry and I found a great salvage store that had all sorts of old doors, windows, mantels and the like. We purchased 2 dressers that we re-purposed into bathroom sinks, as well as 2 doors. We intended to use one of the doors for my pantry and the other as a swinging door between our kitchen and dining room. We refinished the pantry door and it is one of my favorite things about our home with its original glass that has wee bubbles and waves in it, but the swinging door never quite made it to its intended use and has resided in our attic for the past 12 years. Little did we know at the time that this noble old door would find it’s way into my office as and transform into a wonderful DIY desk!
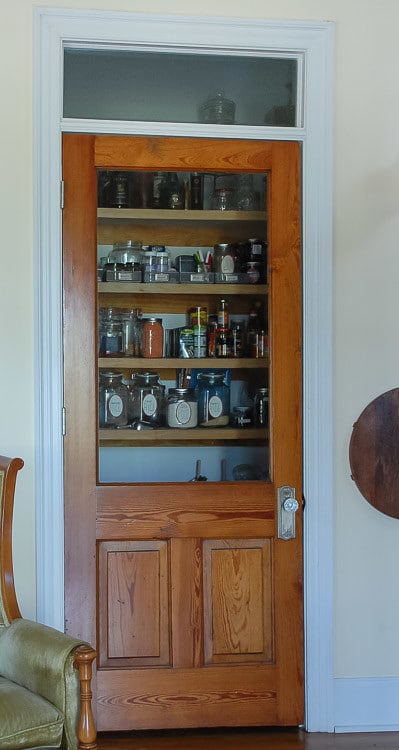
Table of Contents
From time to time I’ve pondered what to do with ‘the door in the attic’. At one point I thought it’d make a great table for outside, but it has recessed panels so would need a glass top and I was afraid of water getting under the glass, so that thought never came to fruition.

Recently it became painfully obvious that the desk I have been using for the past 12 years was really too small. Not only was the top surface on the small side, but I’m a tall gal and I had a hard time sitting at the desk with my long legs. I looked around at many local stores and online sites and finally decided I probably needed to build my own desk to get the height I wanted. Did someone say ‘build my own’? A DIY desk? Music to my ears! Bring on the DIY Door Desk.
Some of these links may be affiliate links and I may earn a small commission off of the sale of these products, but the price you are charged is not affected. You can see my full disclosure policy here.
The lonely ‘door in the attic’ came into my mind again and I figured I could get some great legs made that would have some cool character. I contacted several ironwork shops in my area, but the cost to get a frame built was pretty steep. Finally, I stumbled upon an adjustable height desk frame at Ikea, the BEKANT Underframe for table top. It’s slightly more utilitarian than I originally hoped for, but the $109 price tag instantly made the ‘utilitarian look’ really quite attractive. DIY desk here we come!

I also wanted a sliding keyboard tray on the underside of my DIY desk. After doing much research, I decided on the Rockler 12″ Keyboard Slide. In searching for reviews on the product, I came across Yellow Brick Home’s experience with it, which confirmed my intent to go ahead and get it. You can’t beat the price, $34.99; but more than that, it’s incredibly sturdy, you can determine how wide you want your tray and you can paint the wood for the tray any color you like.
So I had my door, I had my frame and I had my keyboard tray…time for me to get busy! Or rather, time for Terry to get busy…with a wee help from Flora! You guessed it….DIY desk, here we come!
From Door to DIY Desk!
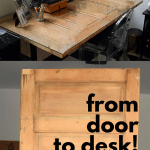
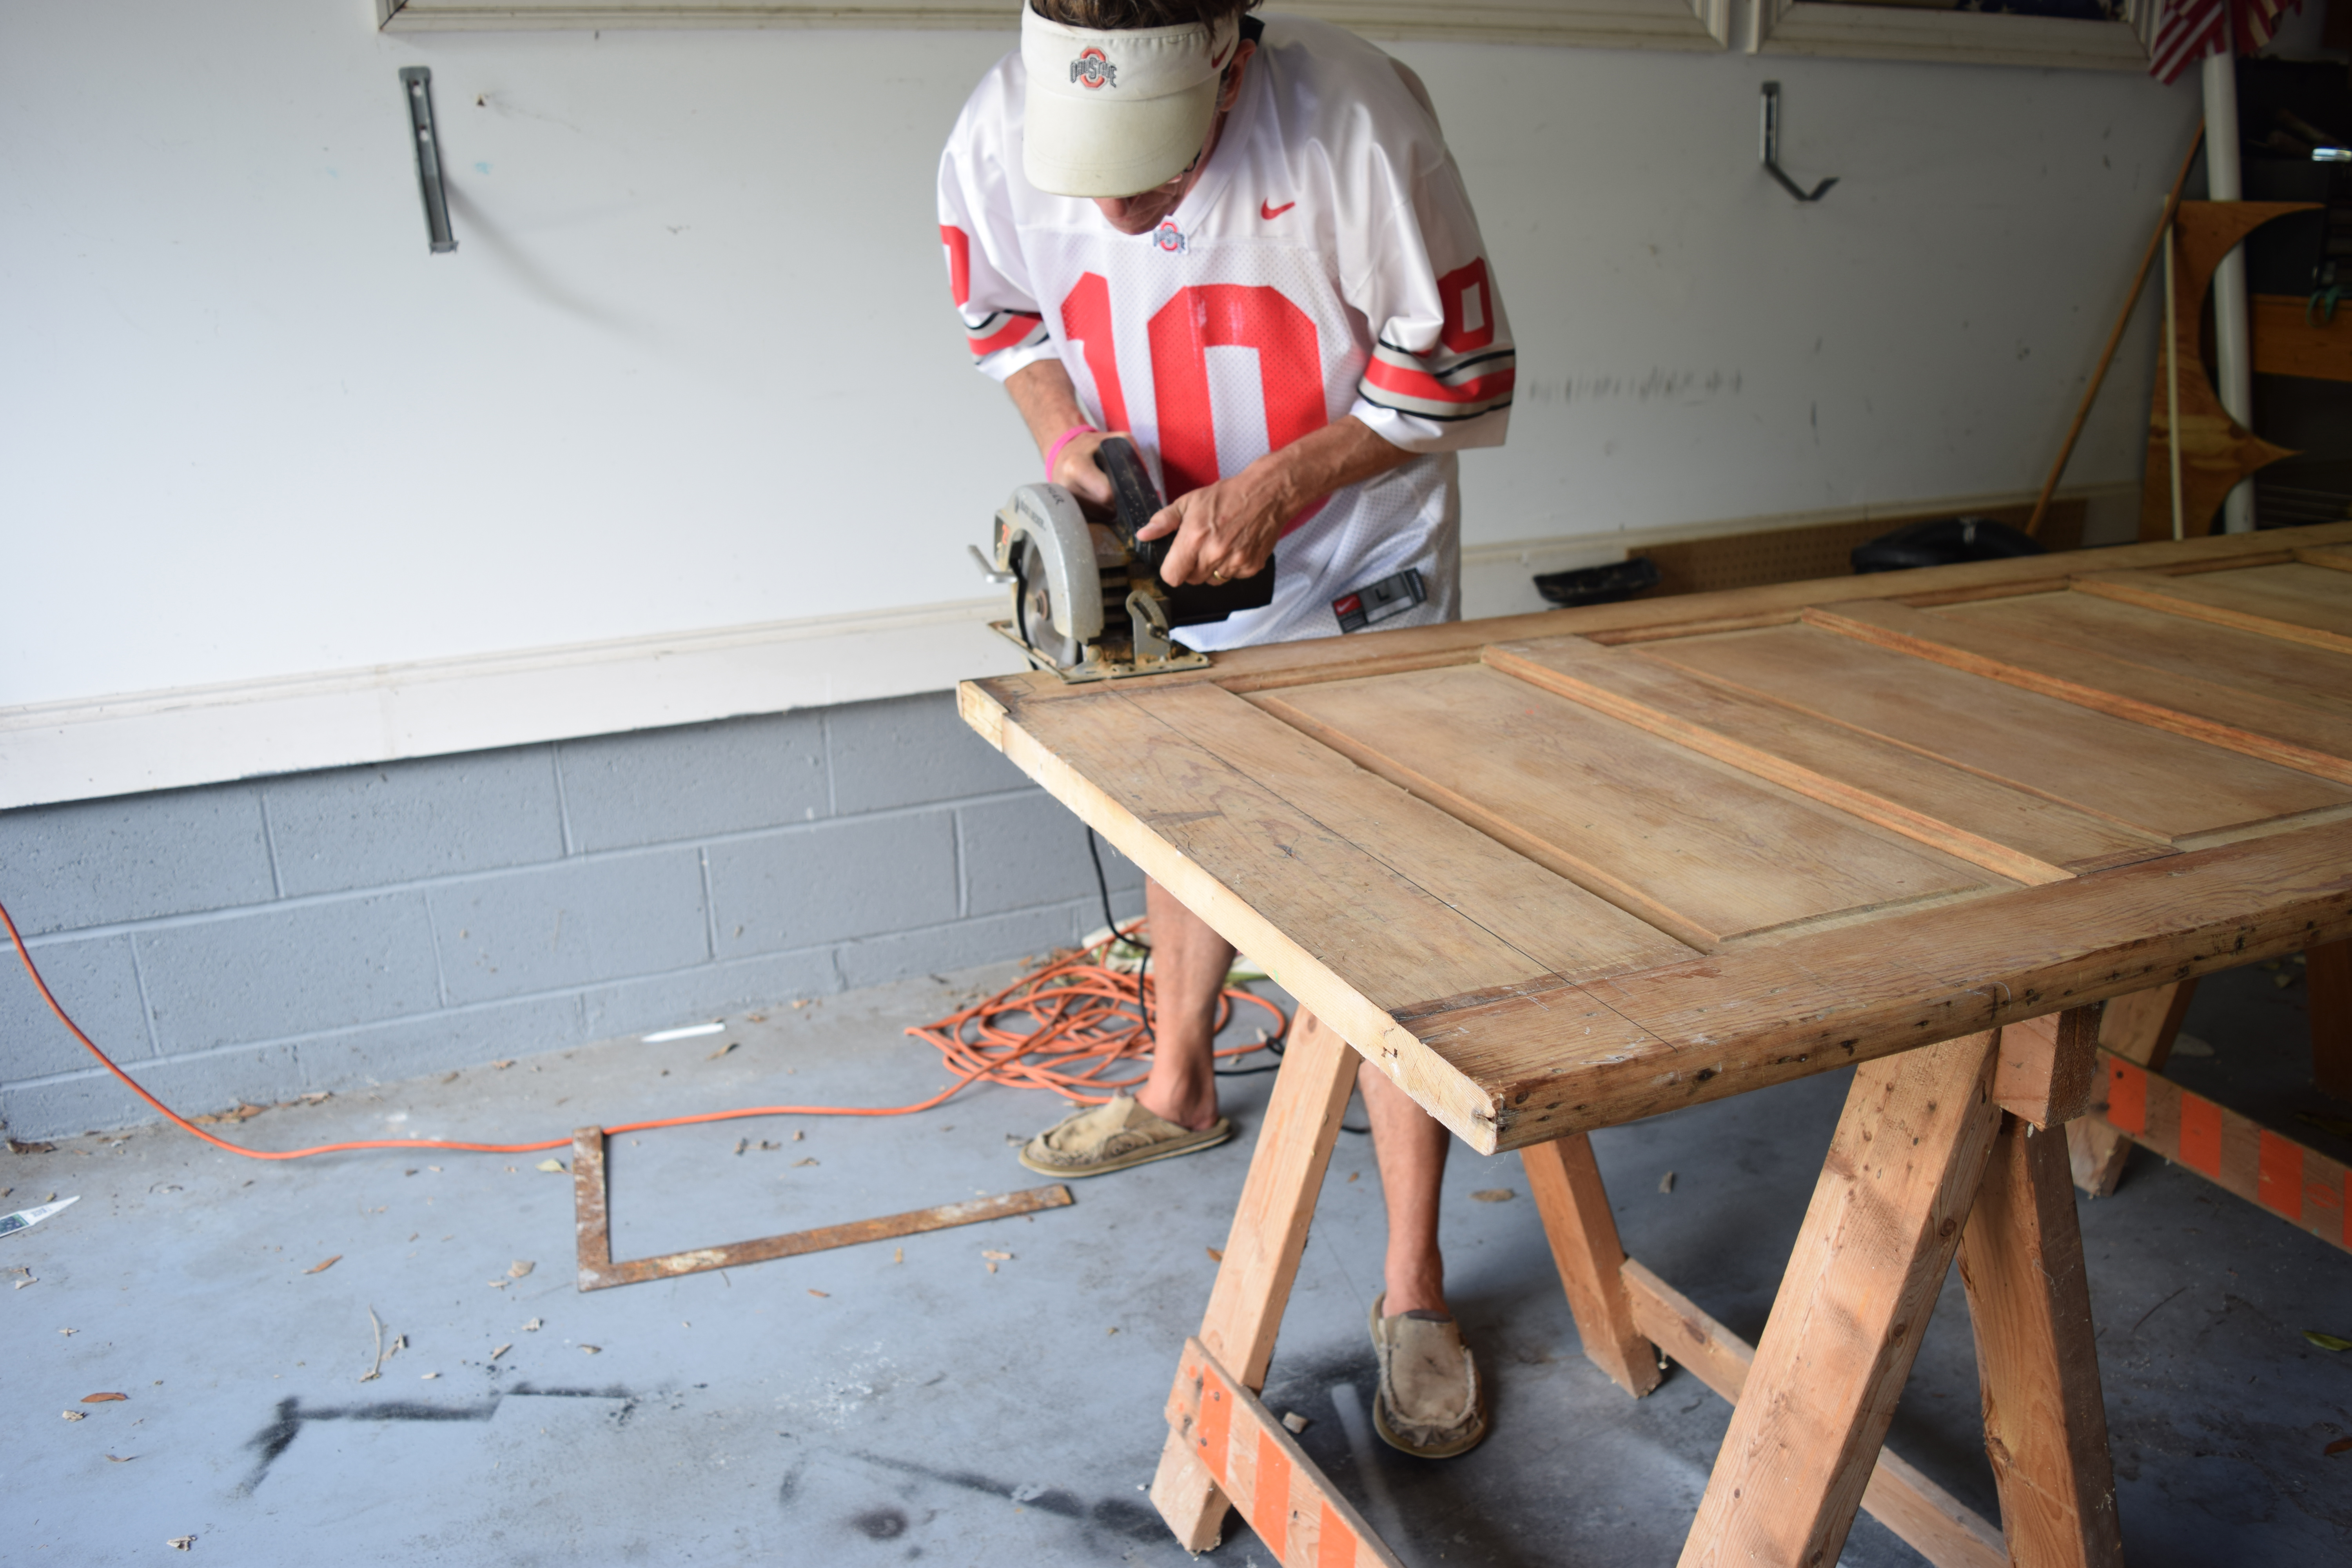
- The door was solid wood. It was 7 feet tall land 3 feet wide. Given the space in my office, I needed to trim it down a wee bit but needed to work with the panels in the door. The area outside of the panel on the bottom of the door was longer than at the top, so we cut it so that both the bottom and top at had 3.5″ outside of each panel. At 36″ it’s pretty wide, but there was really no way to cut anything off the sides so we just worked with that.

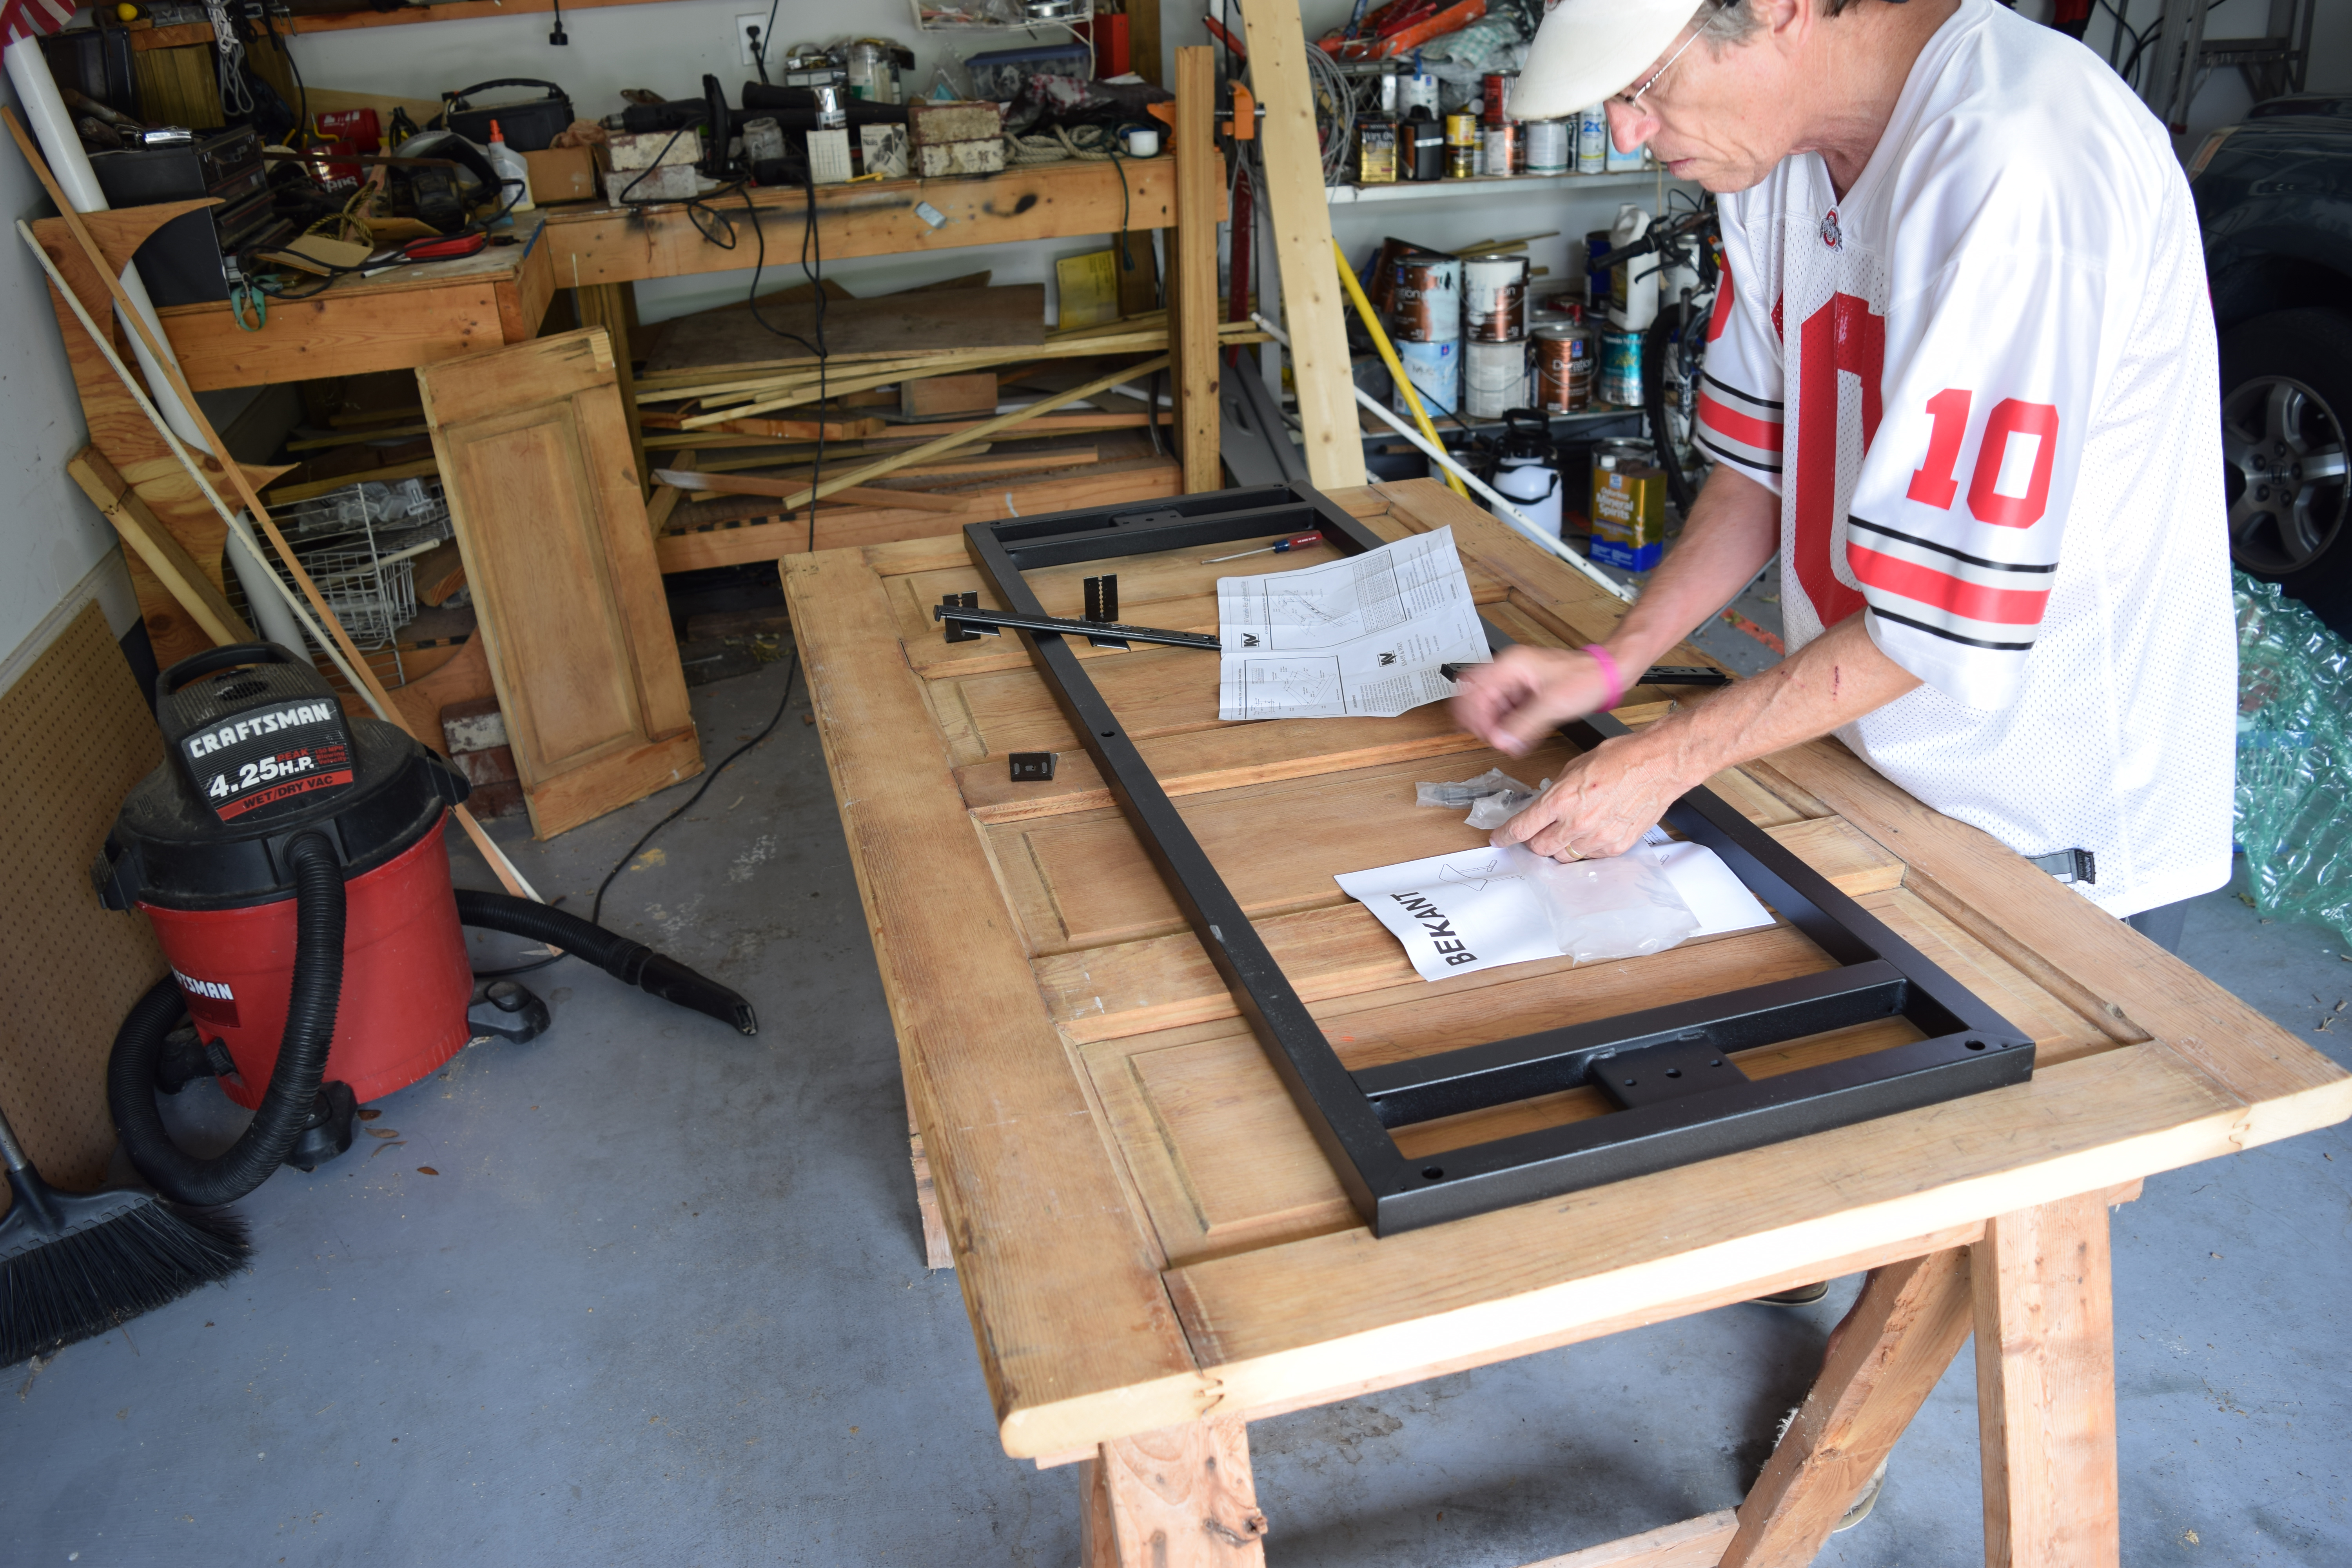
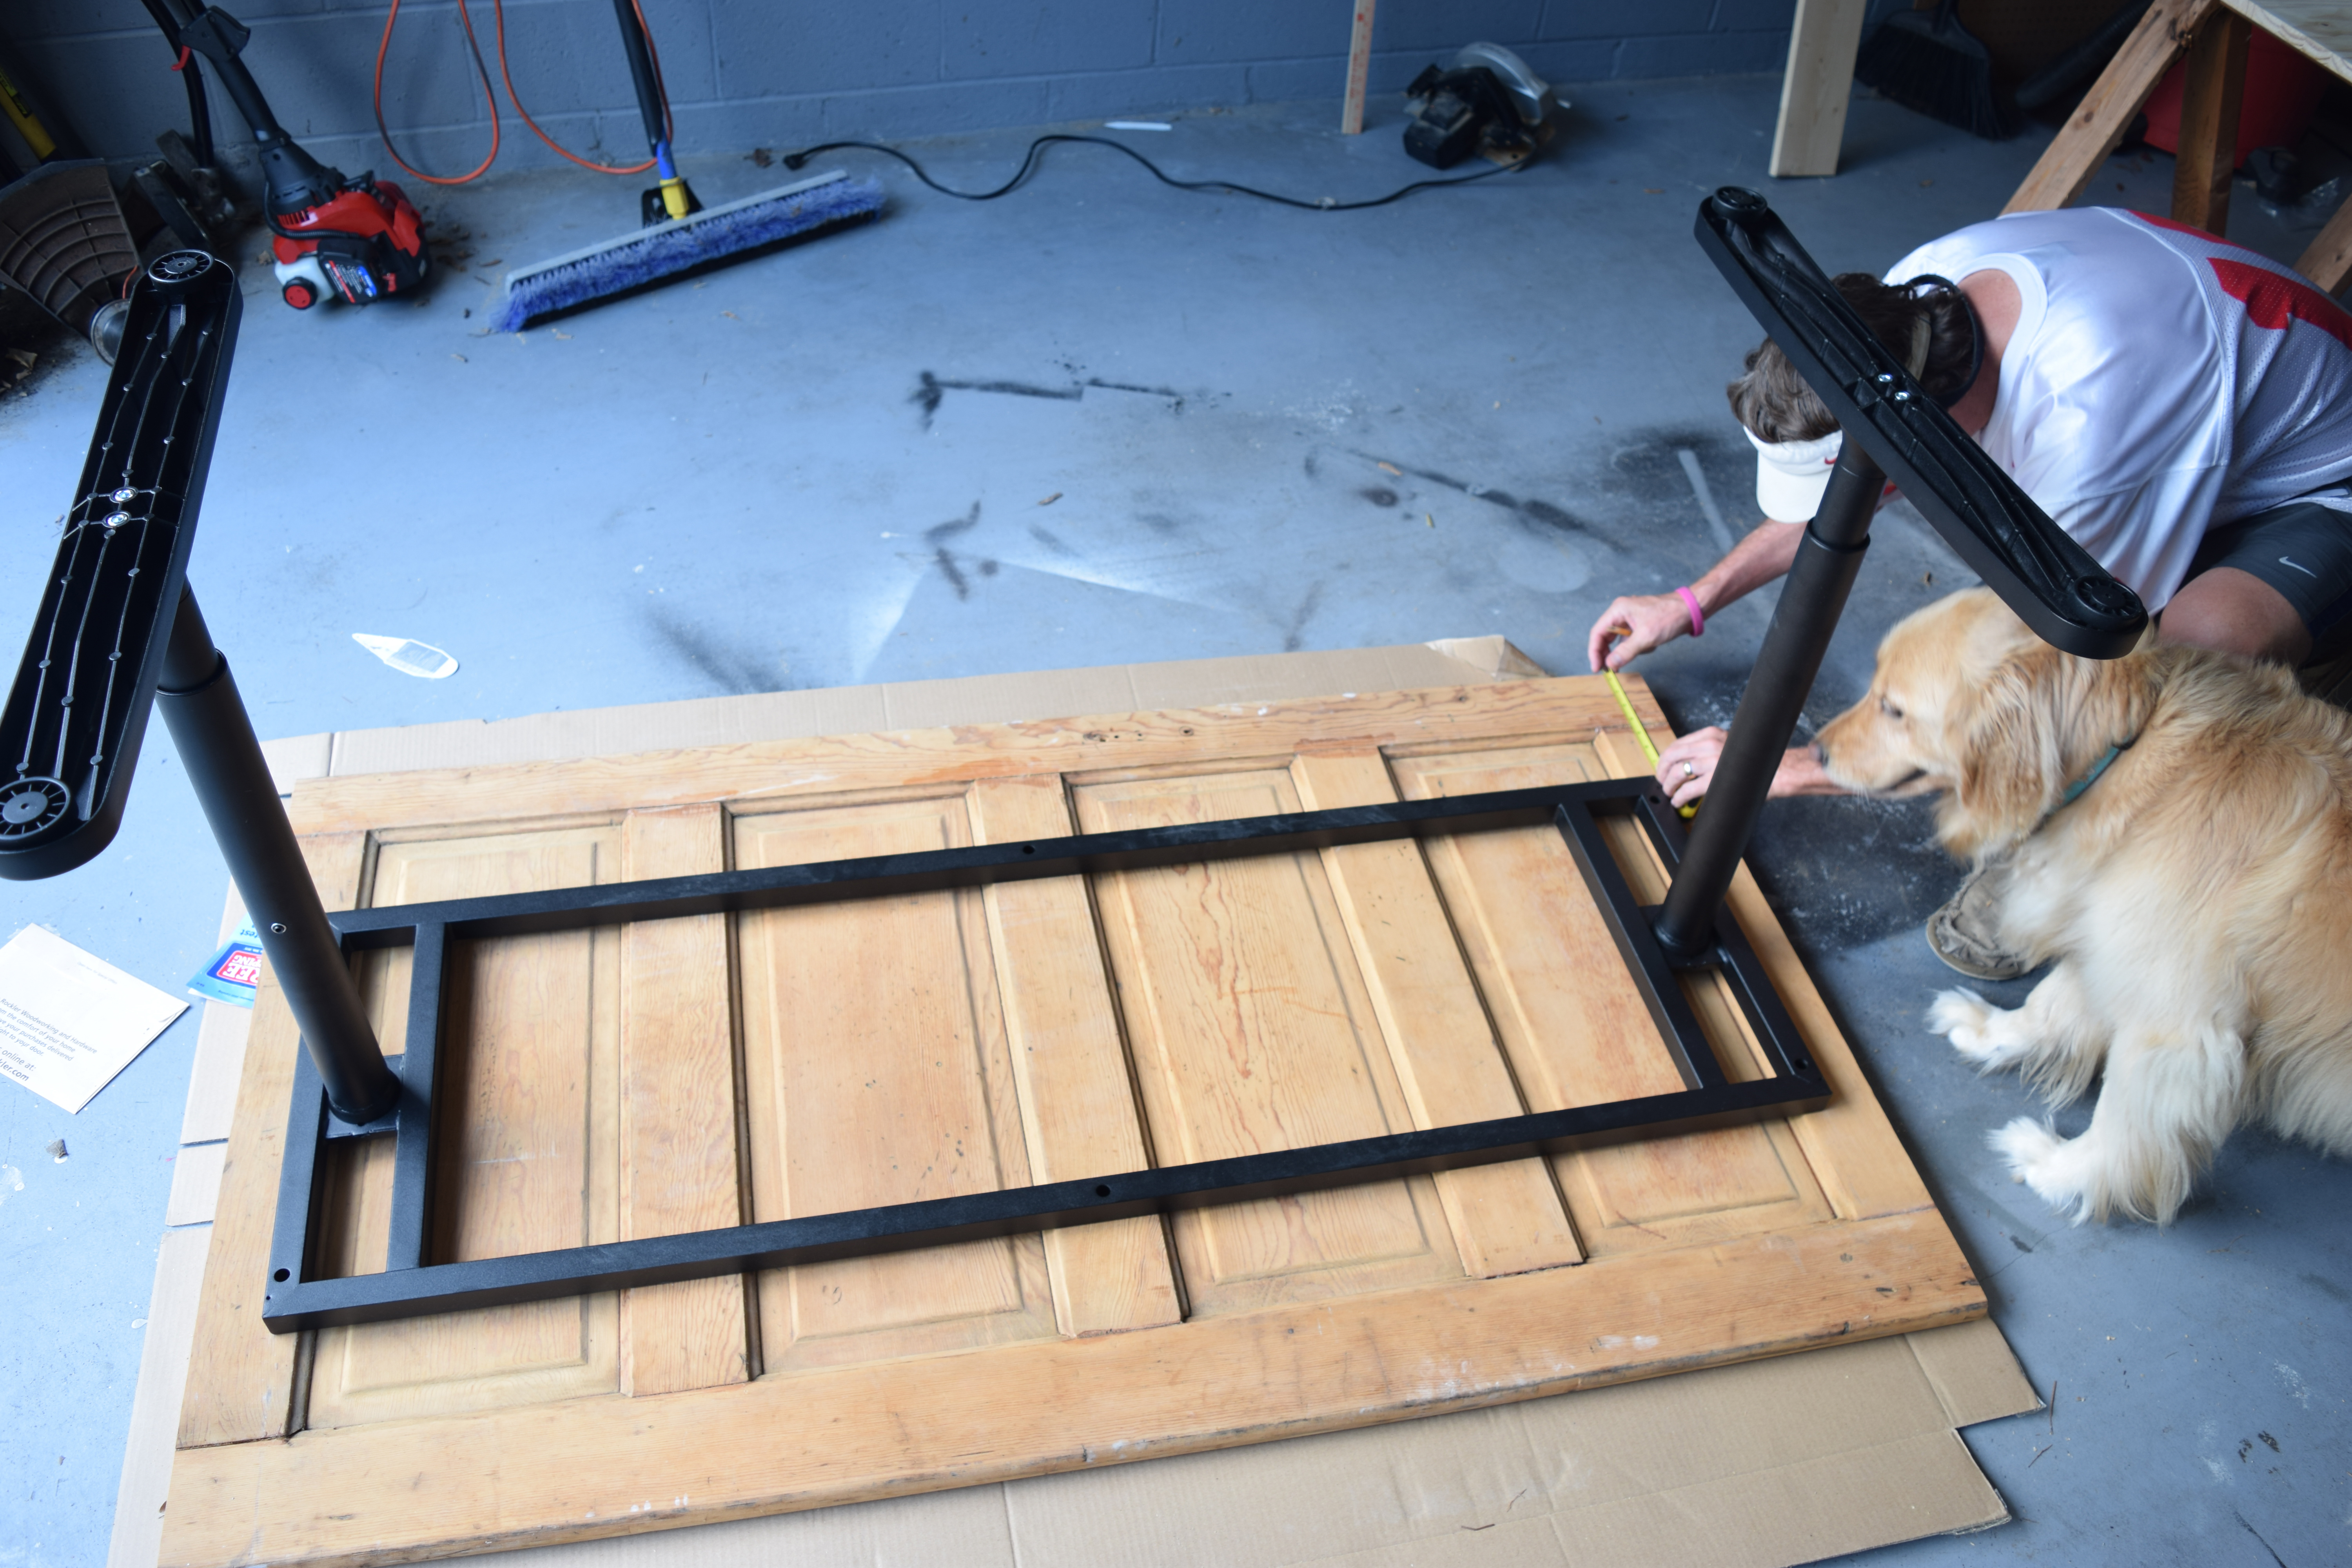
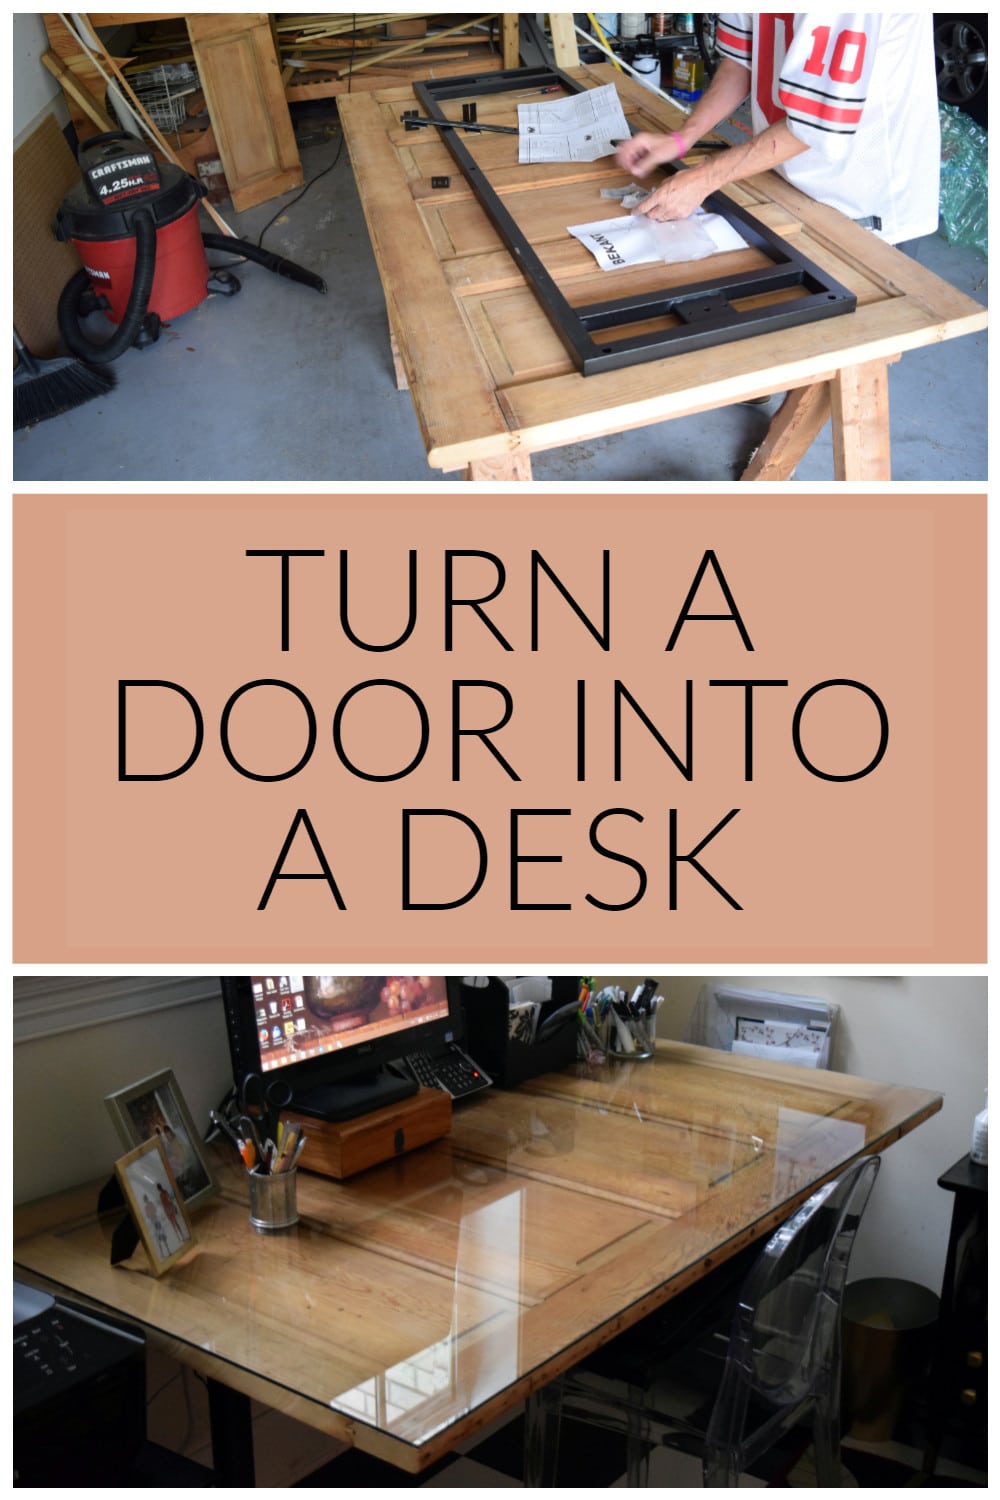
- Then we positioned the underframe on the door. It was that kismet thing again because the frame perfectly fit the raised areas of the door so that we did not need to build up any of the recessed panels. Worse come to worse, we would’ve attached some wood to the recessed areas to build them up to the non-recessed height so that the frame would attach. Holy cow…just realized the view you’re getting of our workbench. I’d love to say that it is a rare occurrence for it to be so messy, but then I’d be lying and that’s a bad thing!

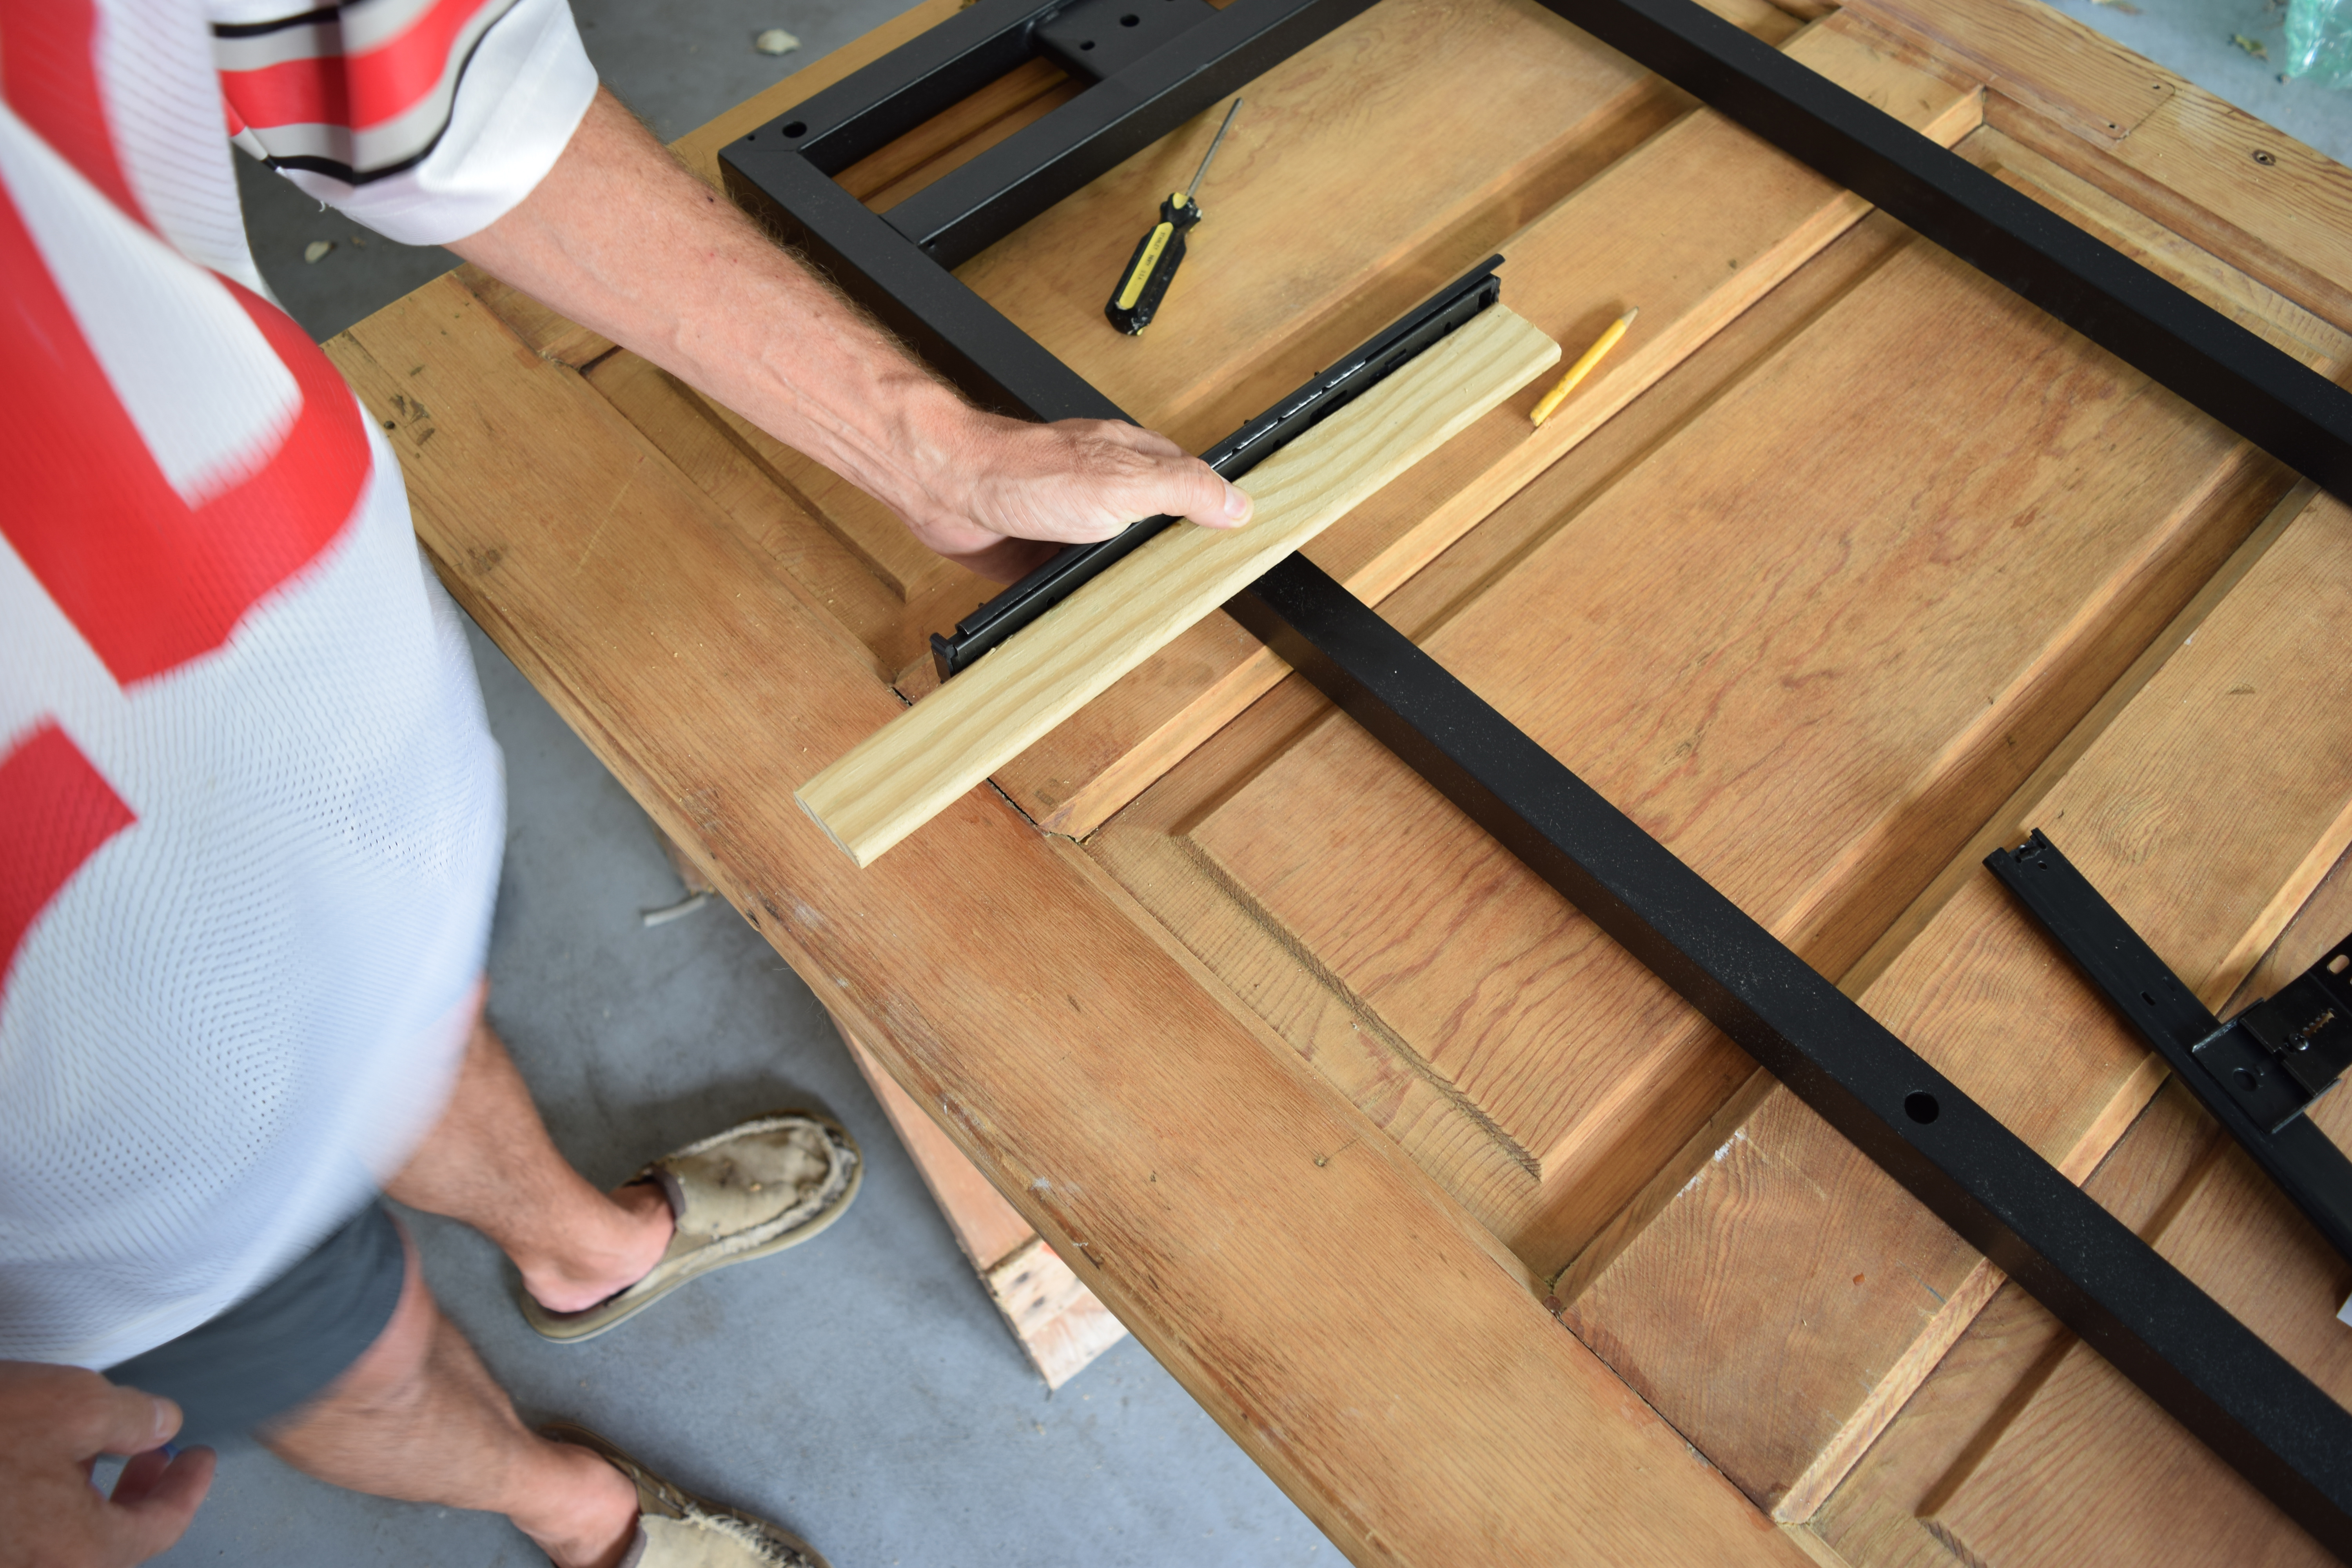
- Figuring out where to attach the sliding keyboard tray was a little wrinkle. In the perfect world, it would have recessed farther back, but we were constrained by the frame as to where we could attach it. But truthfully, after working with it for the past month+, I’m perfectly fine with it. This next photo shows us looking at different options in the placement of the keyboard tray. Do figure that out before you attach your frame. We figured if we needed to we could’ve moved the frame a little off-center to accommodate the keyboard tray, but in the end, we didn’t need to.
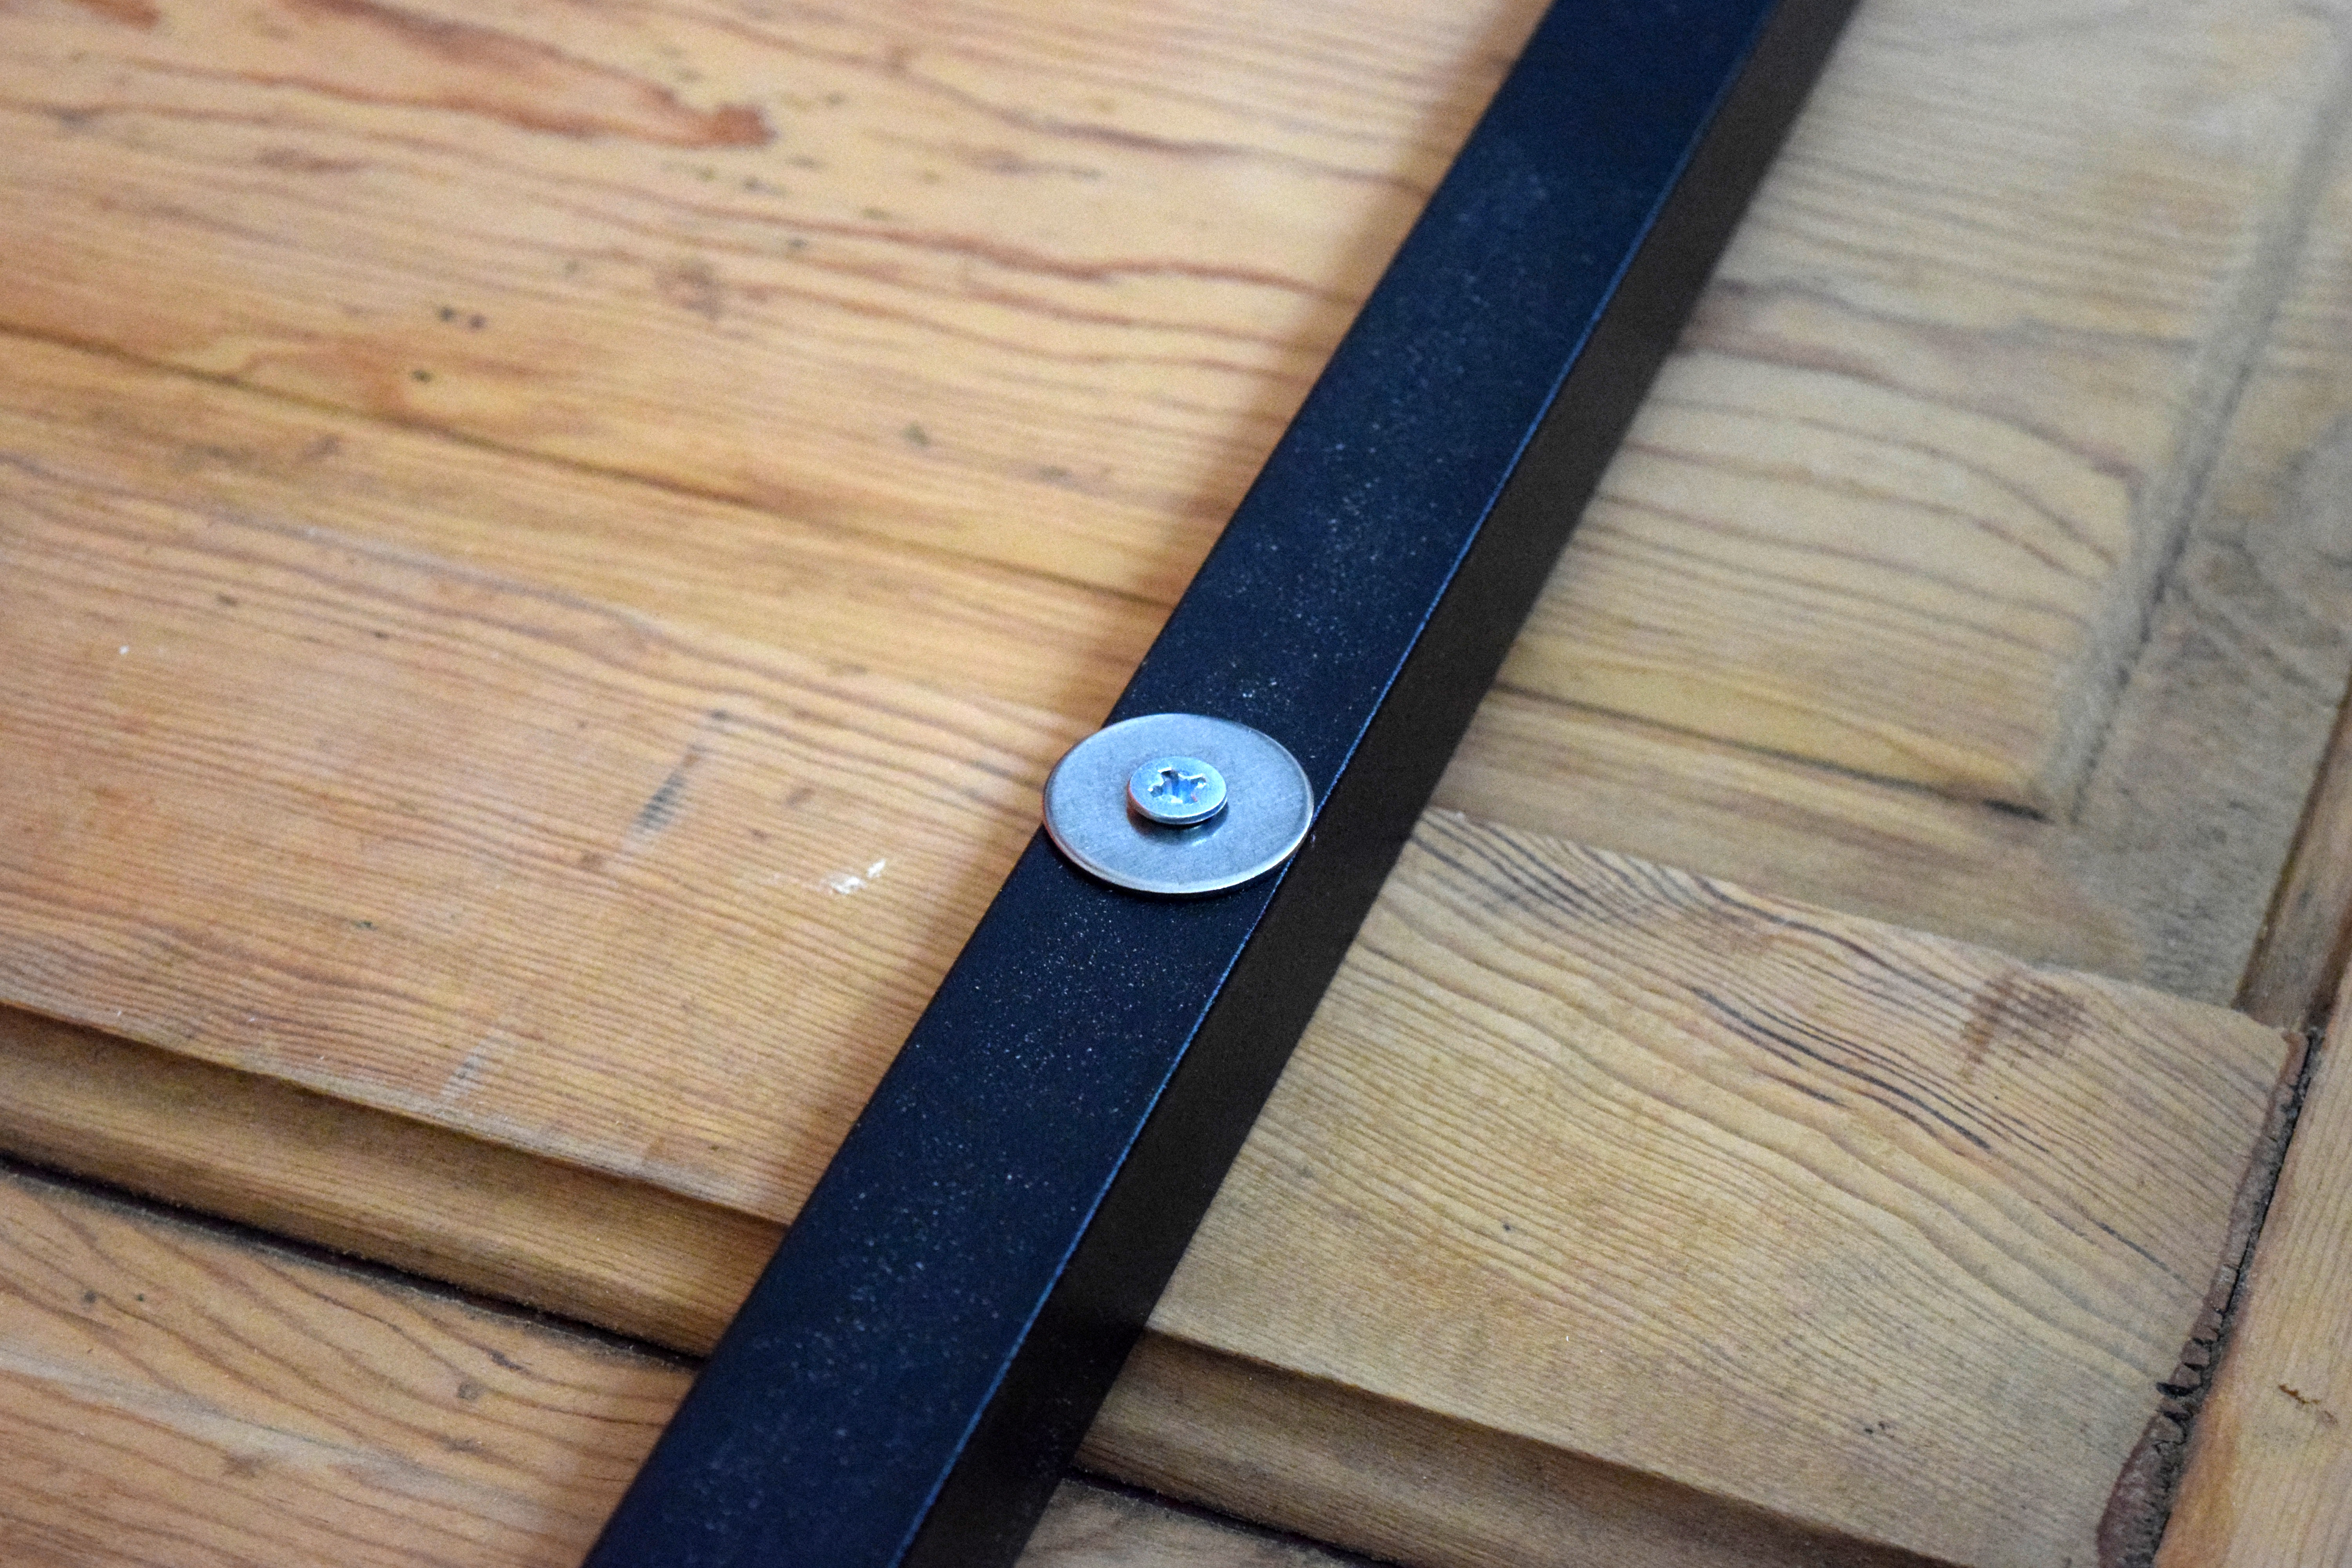
- Once we figured out the placement of the frame and the keyboard tray, it was time to attach the BEKANT frame to the bottom of the door. This frame is very sturdy. You can see how you adjust the height of the table…the bottom half of the legs slide out. Terry’s marking where the frame goes in this picture. We actually moved the whole shebang inside the house for the rest of the project as the finished desk would not have fit through the doors otherwise.
- Once it was inside and we had the frame attached, it was time to attach the sliding keyboard tray. I had purchased a piece of pine that was 15″ wide so Terry only needed to cut down the length to 27″ which is what we decided would be ‘optimal’ for my keyboard and mouse pad. I spray painted the whole thing a glossy black. I had initially thought I wanted a real color but decided to stay neutral-ish and to make the keyboard less prominent.
We get many of our building supplies at Home Depot. They have a wonderful program by which you can order here online and then pick-up at your nearest store within hours or at your convenience. In addition to building materials, they have an extensive selection of power tools and an excellent rental program if buying is not an option for you.


- You can see in this picture right above how the brackets for the keyboard needed to be placed taking into consideration the frame.
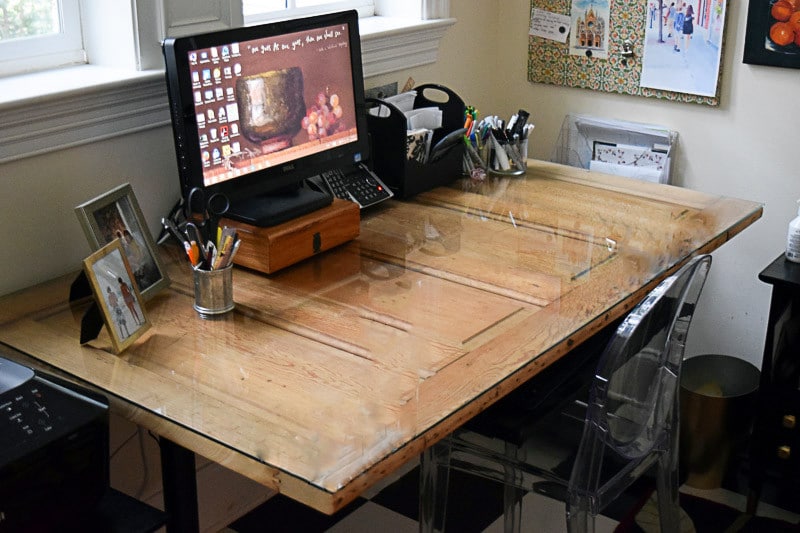
The Finished Product…My DIY Desk!
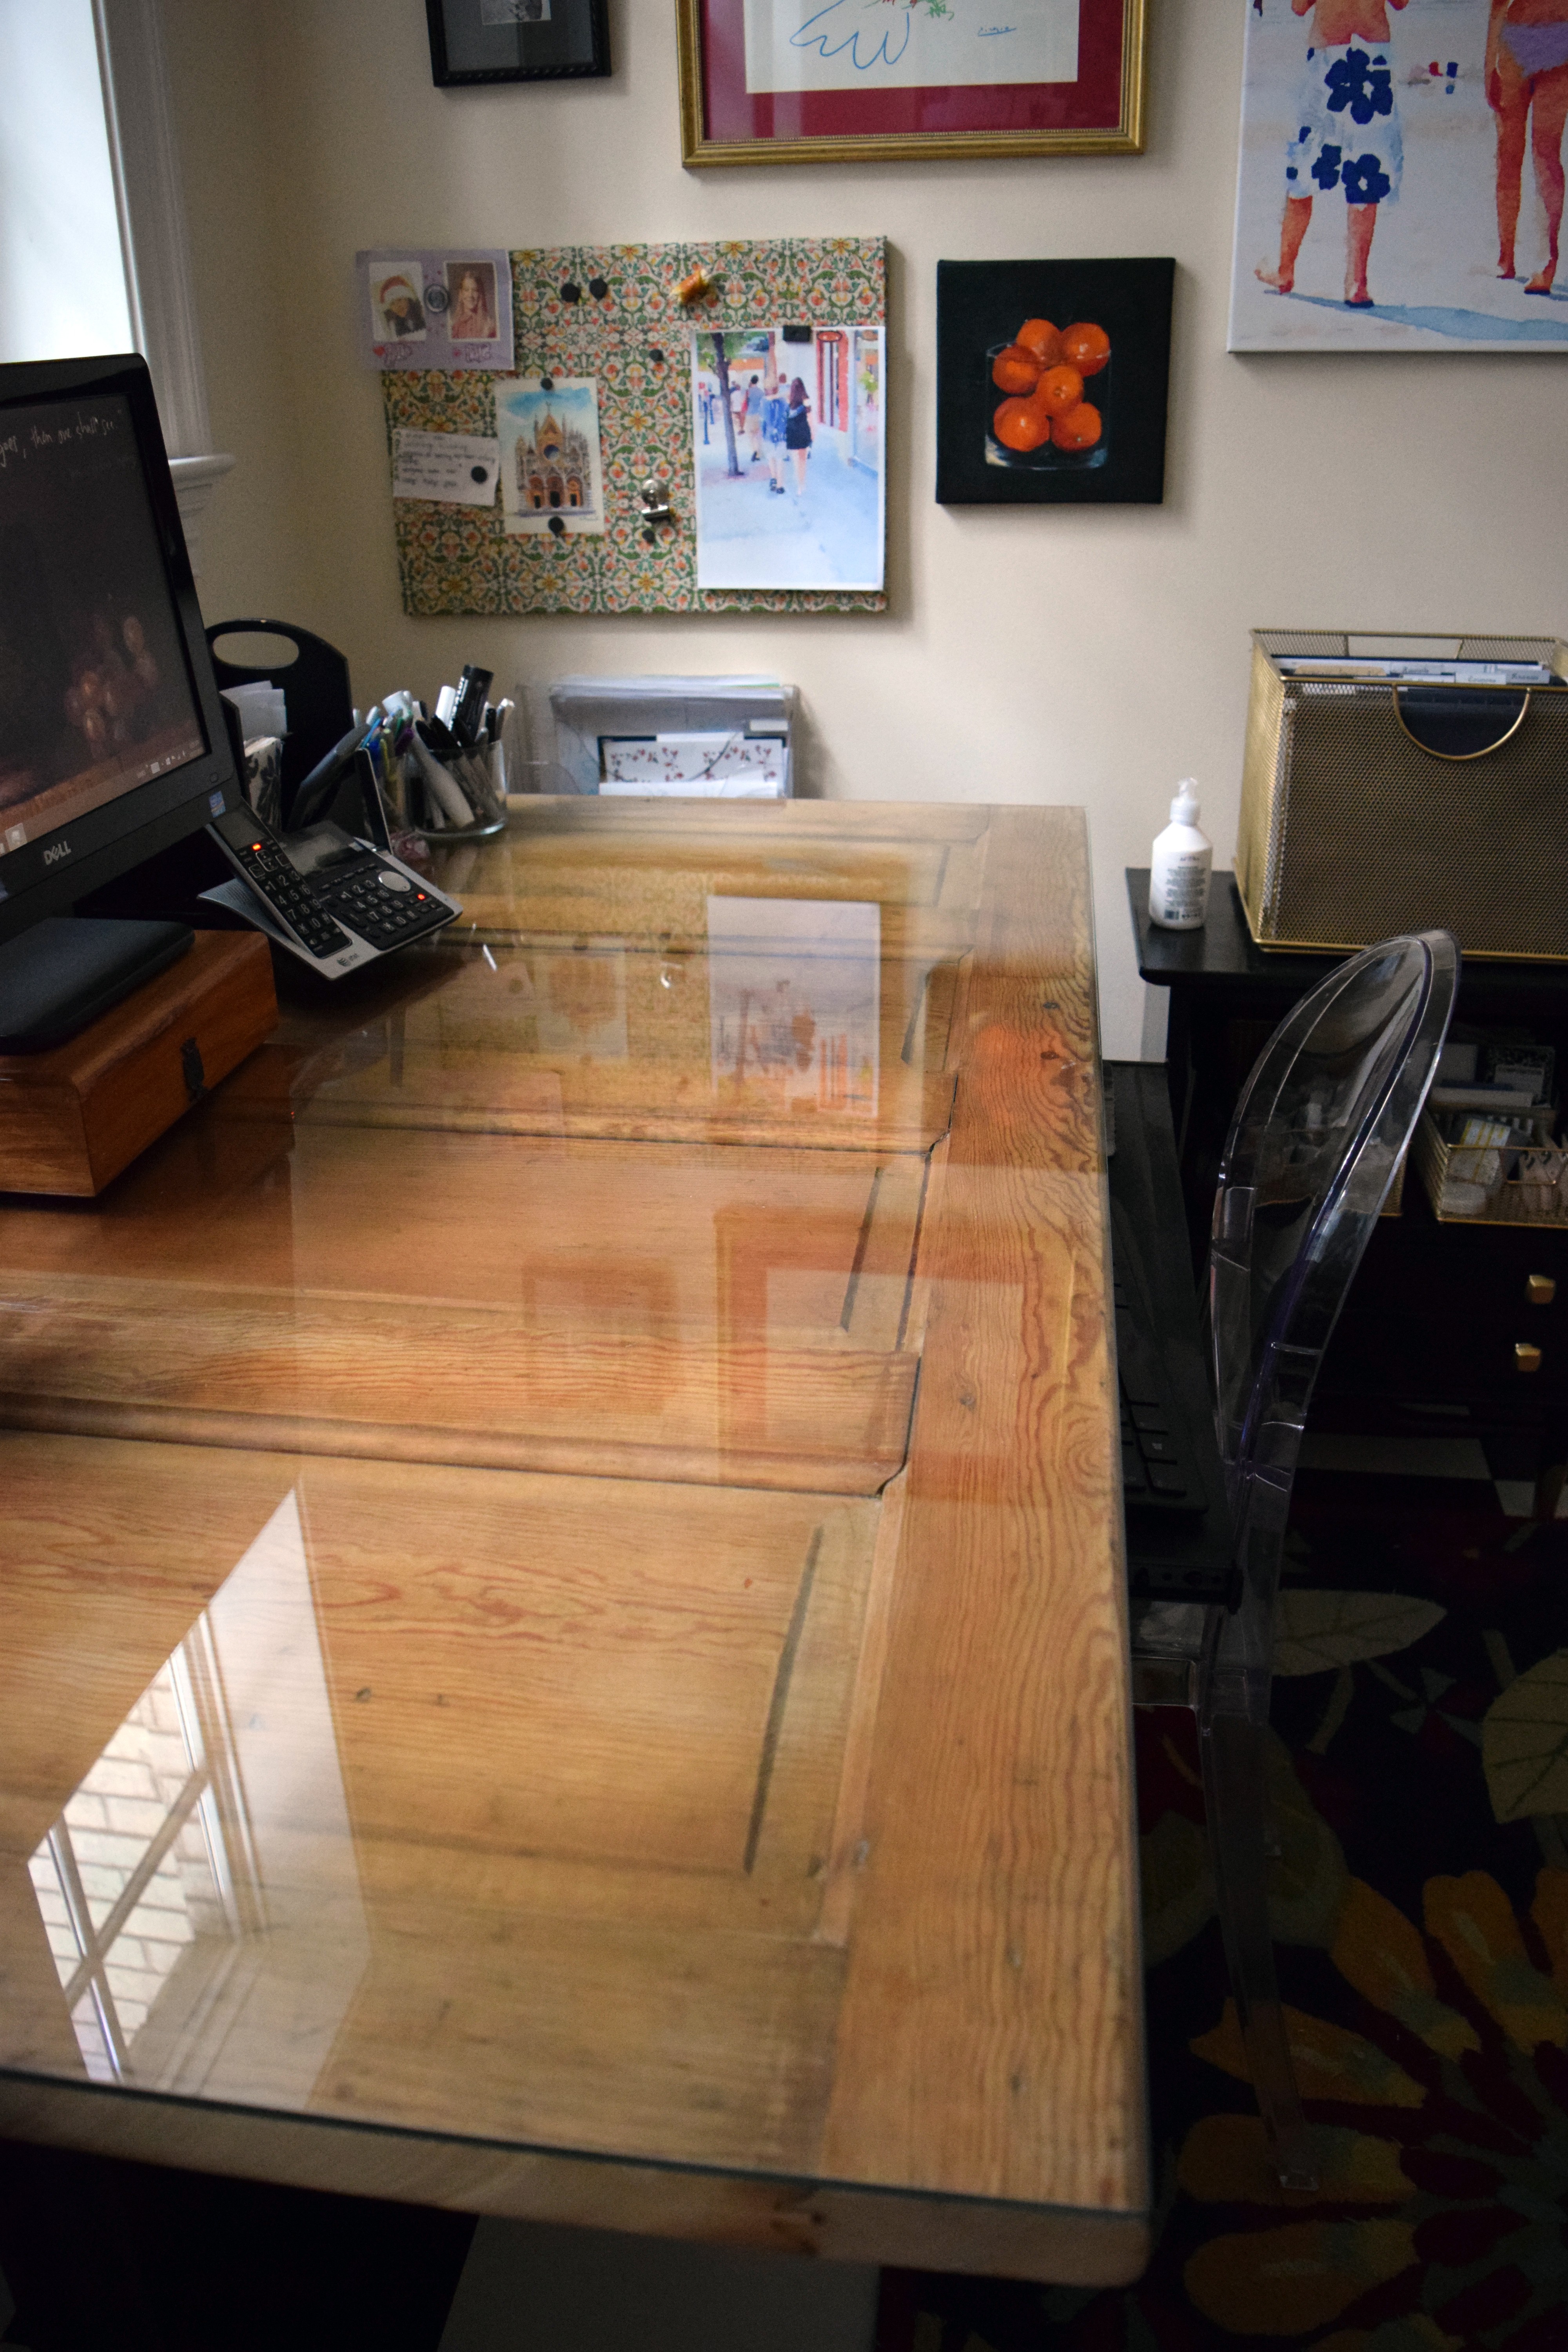
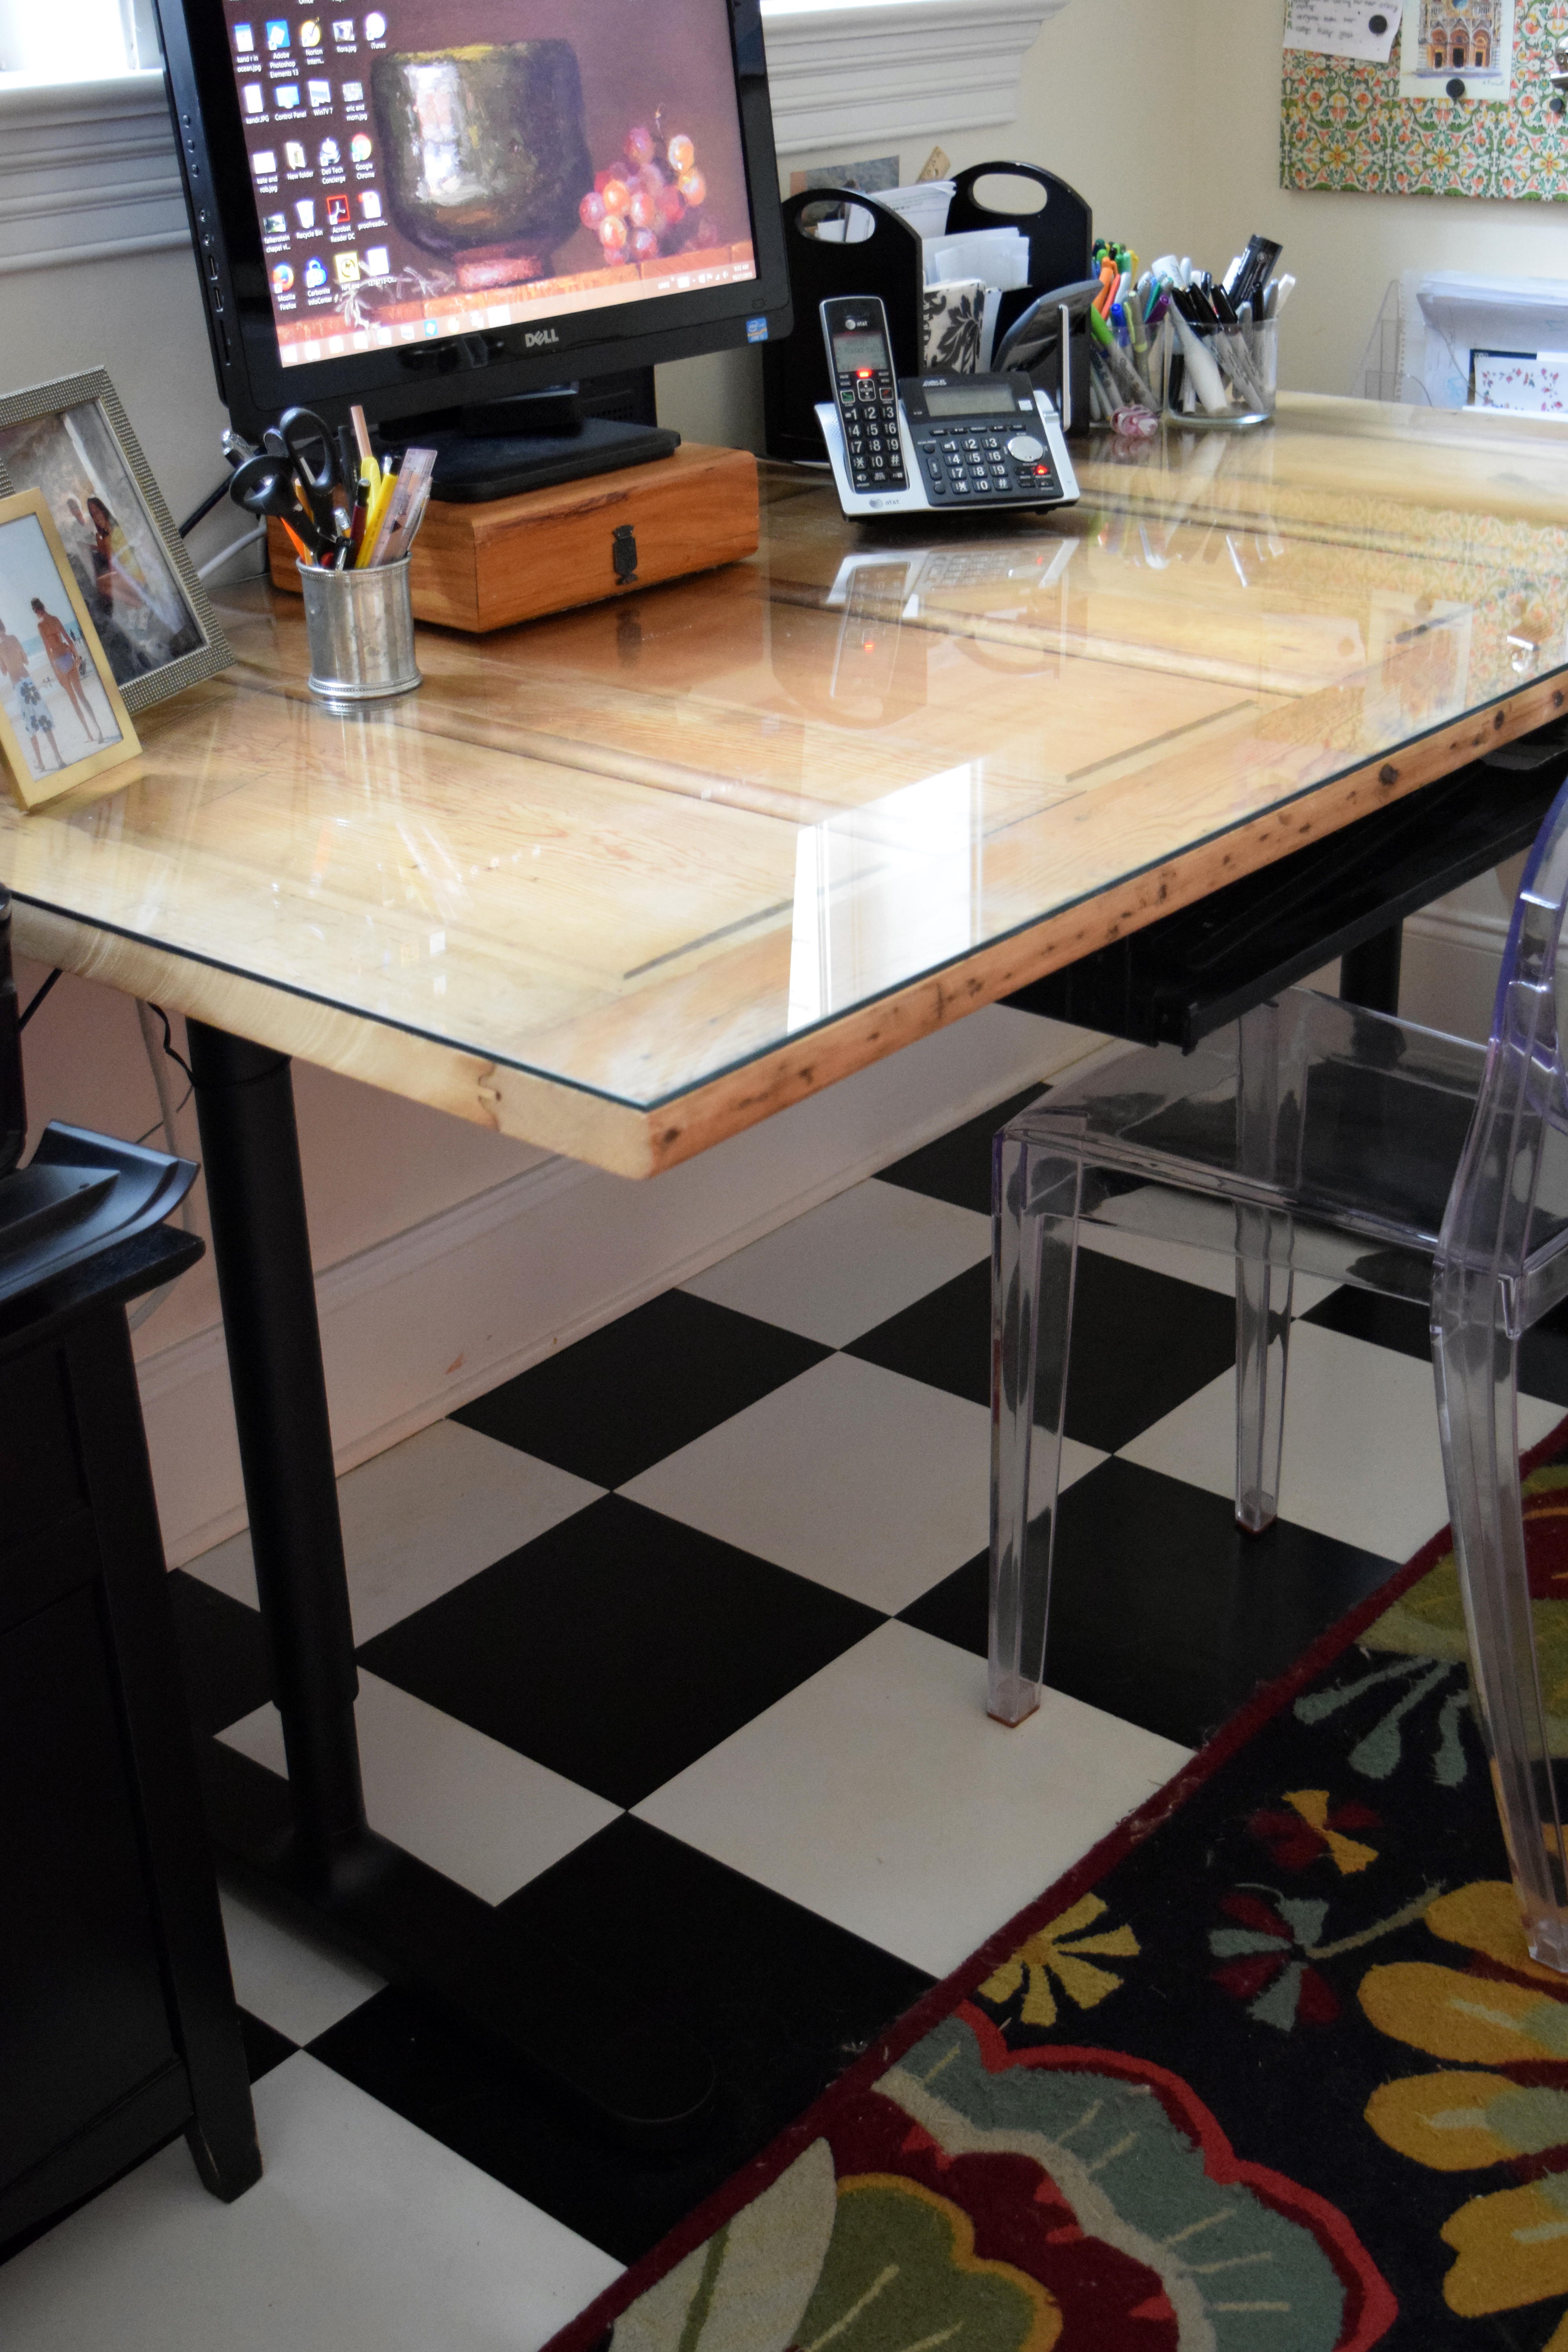

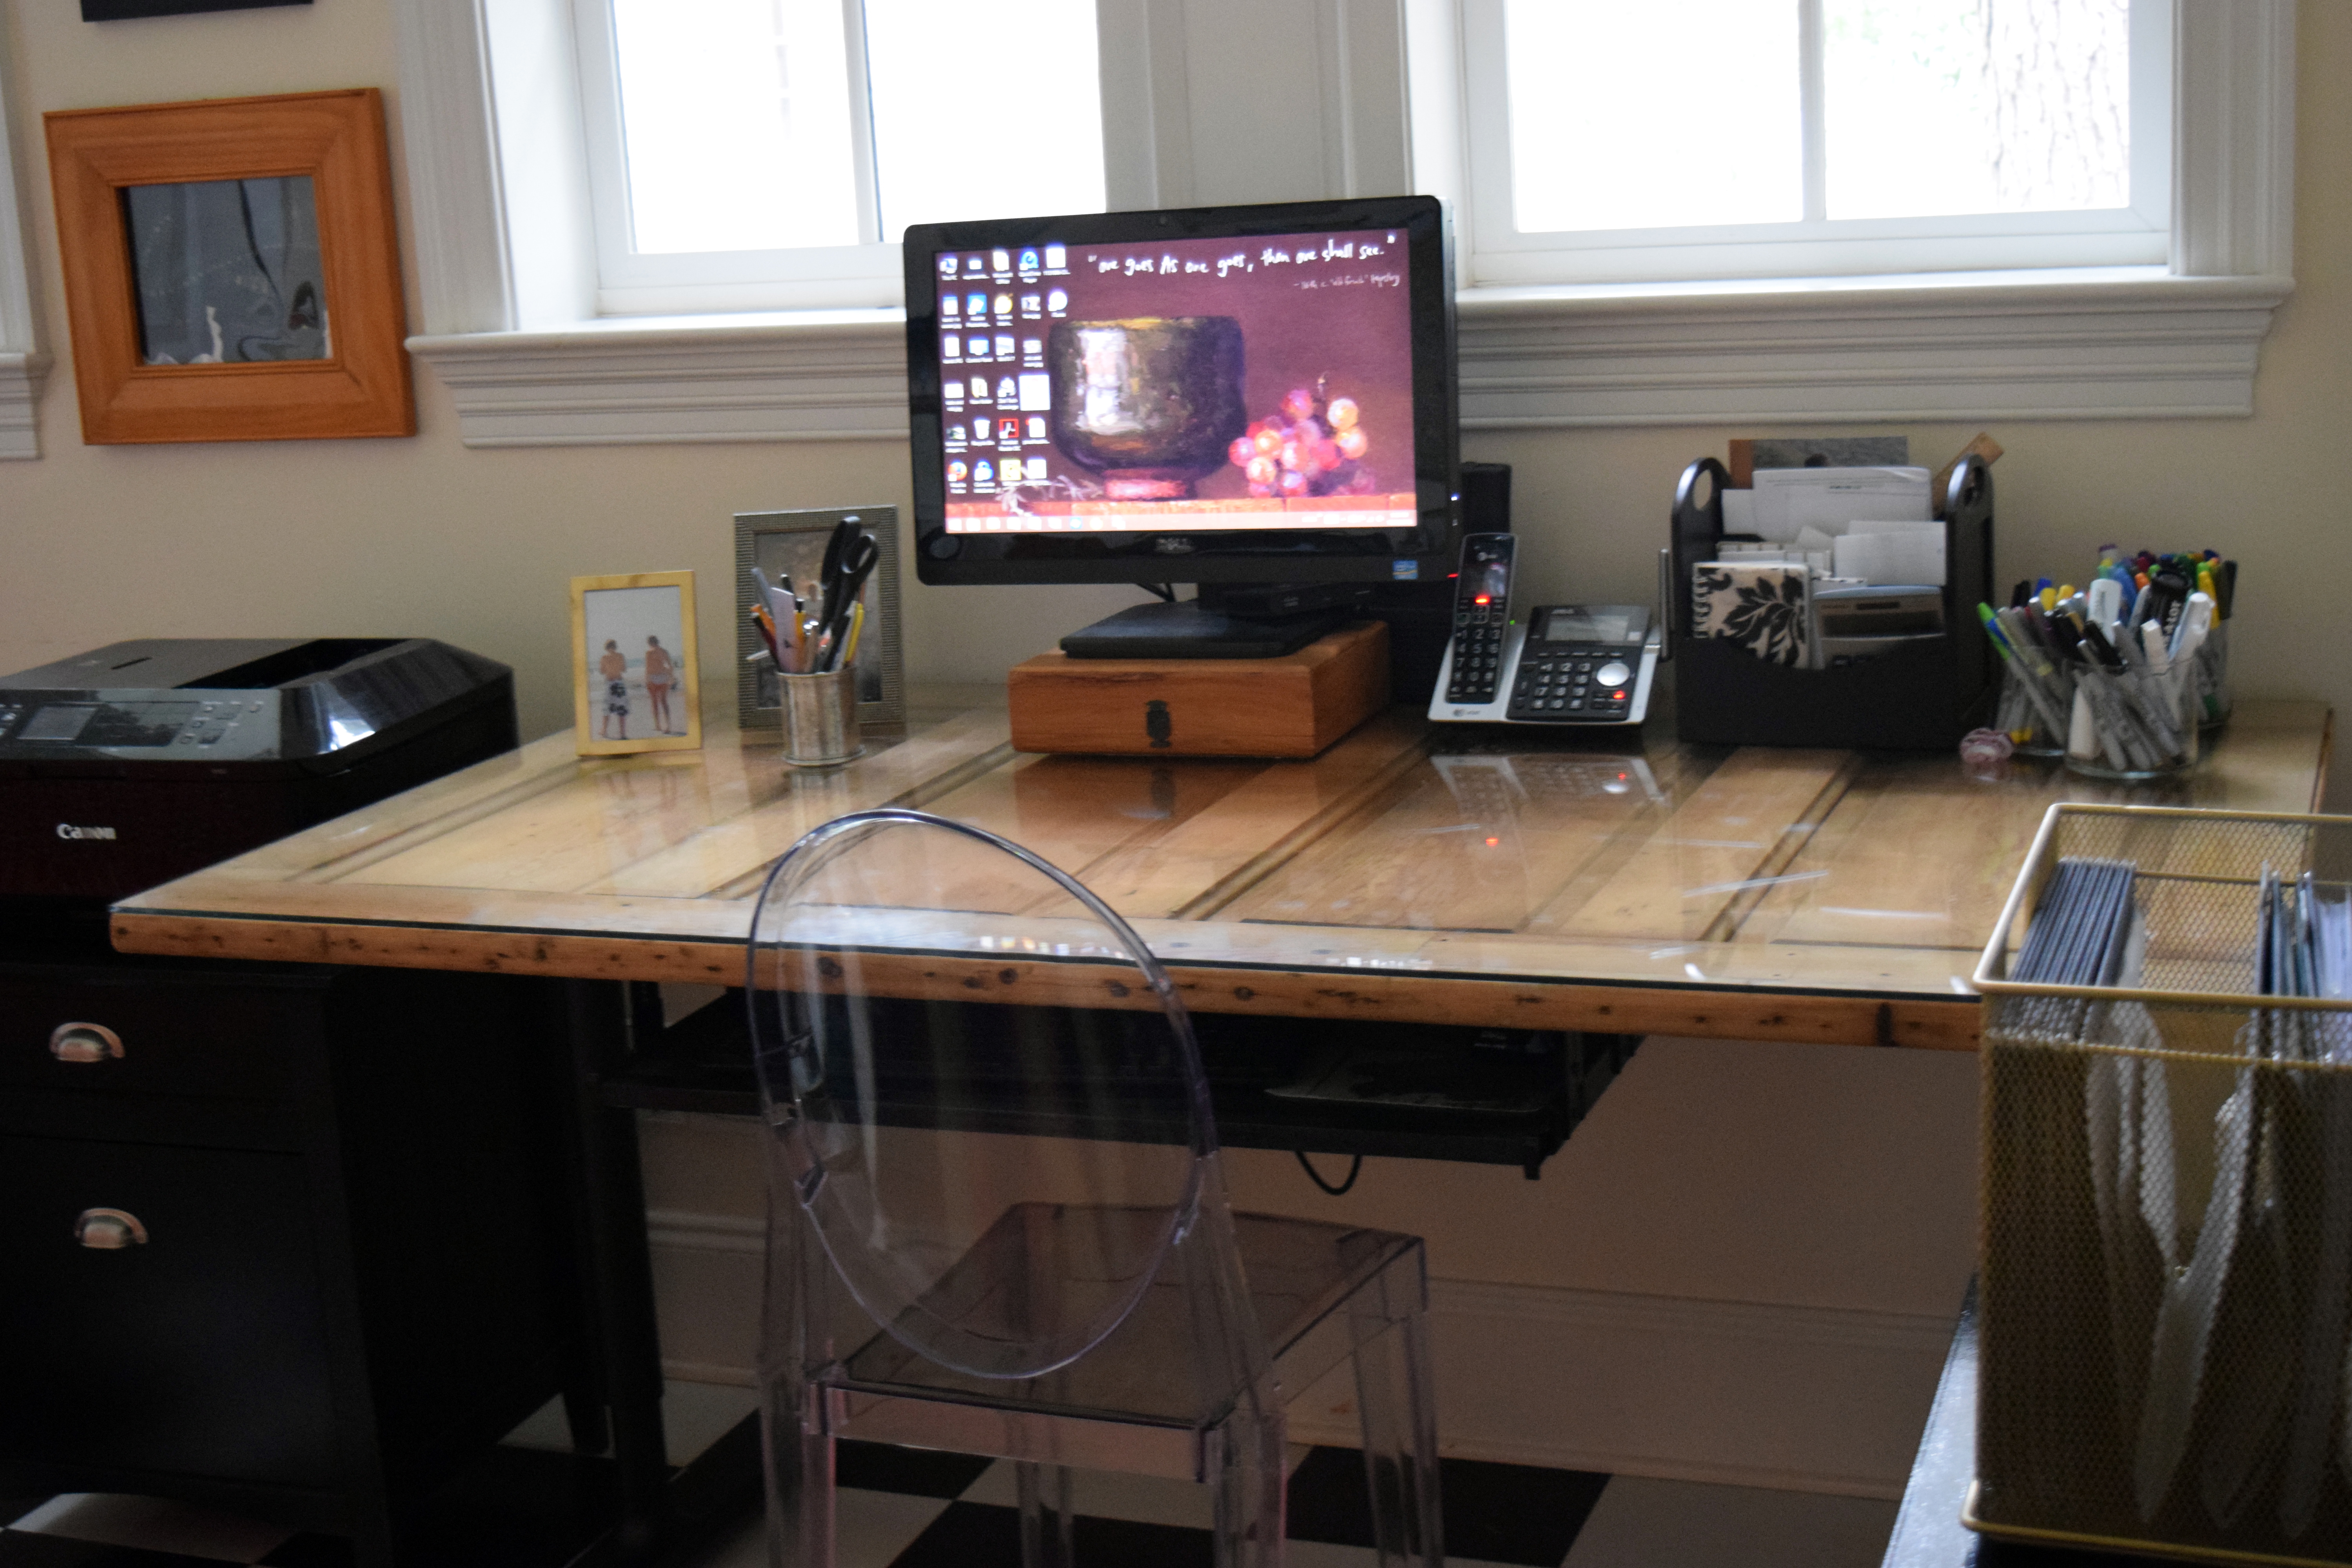
I ordered a piece of glass, 1/4″ thick to cover my DIY desk and to make an even writing surface.
I have SOOOOO much more room on my new DIY desk. Like almost twice as much as I had with my wee person desk. My office is slowly evolving to become what I want it to be. I’m still really loving my Roadside Rescued Storage and it’s completely filling the need I had for it to be convenient storage.
Since I have posted this, I have added an update to my desk with these DIY Rifle Paper Desk Accessories!
Next up…think I need some curtains for my windows. I had curtains up for like ever, but I when I took them down this spring to have the windows washed, I realized how much brighter and lighter my office was without them and I just couldn’t bear to put them back up. But, I think I need to do something. And while I love my ghost chair, think I need to get a REAL office chair, with wheels and everything.

I also think I’m going to try my hand at reupholstering my comfy office chair. It’s a very important chair…

Bookmark this page or pin the following image to refer back to this DIY Desk post in the future.
If you liked this project, you might also be interested in another furniture project, building a console table. Let me know what you think!
Thanks again for spending a few minutes of your busy day with me today.
Please know that I welcome each and every comment that comes my way. If you want to make sure you don’t miss future content, pop your email in the beige box up on the right or click here. I usually send out 2-3 emails a week, so I won’t inundate your inbox…believe me, I’m sensitive to an overflowing email inbox!
By subscribing to Nourish and Nestle, we will only use your email address to send you emails (no more than 2-3 per week) that will keep you up to date with the latest news and content on the site. In addition, you will have access to my growing library of knit & crochet patterns, as well as other printables. This library will continue to grow, so check back often.
And please know that you can unsubscribe at any time by emailing me or clicking on the “unsubscribe” link at the bottom of all of our emails.
You can access many of the products I refer to in all of my posts on my Nourish and Nestle Amazon Page. You can access it here.
So, if you’d like to get in on the ‘subscriber benefit’ action, simply subscribe to Nourish and Nestle here or using the form on the right sidebar. It’s towards the top a bit. I have sent all my subscribers the link to the Subscriber Benefits Library. If you missed it or misplaced it, drop me a line.
Until next time…
Hugs,

![]()


What a great idea Lynn, to make a desk out of that old door! I’d love to have that desk ;). It made me smile how your dog showed up in the pictures to check out if everything was going well… hahaha it just looks like that! Adorable. Your pantry door is beautiful as well, what great finds!
Guten Tag Friend!I do love my desk…sitting at it right now! And my sweet pup Flora is my shadow. If I’m at my desk, she’s under it. If I get up, she follows. She’s the perfect pup!
Hope you had a good weekend Trick or Treating with your kiddos.
And Congrats again on your Blogger Recognition Award. You really have a lovely site and so deserve the award.
Lynn
Thank you for all the wonderful information. Where did you order the glass from?
Hi Cindy,
I got it from a local glass store. That’s probably the most expensive part of the project.
Your new desk is awesome, with lots of room and neat and orderly. Would love to have a large desk, but then I would need a larger room as well. LOL. Thanks for sharing!
Hi Linda, this big desk did take some getting used to. For instance, I can’t reach over it to open the window and I have to really stretch to reach the phone, but all worth it! Thanks for visiting today.
BTW, enjoyed viewing your fall tablescapes! Thanks for sharing.
Lynn
Very cool! I love the style of your decor, and this is such a unique DIY project! Just lovely!
Hi Lindsey, thanks for stopping by today and thanks for your kind comments on my desk. I really do love it…sitting at it right now as a matter of fact. And it really was an easy project…just get yourself a great door!
Have a great day, Lynn
Tha tis one beautiful desk. Lynn. Ample and gorgeous with just the right amount of rustic . It was very clever of you to use those legs. My son is also very tall and he got the adjustable ikea legs as well for his desk. Of course yours is much nicer with the glass topping it off..
Good Morning Mary, thanks! I do love my desk and ‘ample’ is the perfect word to describe it. Aren’t those Ikea legs great!? So glad to have discovered them. And just visited your site and spied your Chivalrous Trunk…fantastic!
Have great day, Lynn
This turned out beautifully! What’s funny is I have the same desk as your old one that was given as a hand-me-down!
Hi Kate…and Lady! Thanks for your compliments. I am quite tickled with it. So is my husband, he’ll walk in my office and lovingly rub his hand over the top and say, “this turned out so well.”…even 2 months later. And what a hoot about you having that black desk! I’m trying to decide if it’s worth painting and putting in my daughter’s room. We’ll see.
And Lady needs to meet Flora…who is my sidekick and ‘practically perfect in every way’.
Definitely worth repainting! I saw Flora supervising in your photos, she’s a doll!
Hi Kate (which is my daughter’s name and is, hand’s down, the greatest girl name!!! Love that it’s short and sweet, classic and powerful, yet feminine.)
Thanks for input on desk. Since it’s laminate I have a great primer that I’ll use on it and we’ll see how it goes.
Hope you and Lady have a great weekend.
Lynn
super cool–and I love the glass top! We tried to make a desk out of a door, but it didn’t turn out quite as well LOL In fact, for budget reasons, we used a hollow flat door from HD and it did the trick for about a year..then we moved and it broke along the way. I love how much space you have…jealous!! 🙂 -kristiina
#waywow
Hi again Kristina, I’ve got to be honest…LOVE my desk. So nice to be able to spread my stuff out on it. Go find a cool old one at a Salvage store! Thanks so much for stopping by for a visit. It’s been great ‘chatting’ with you.
Have a great Friday!
Lyn
Dear Lynn, I want to run right out to Ikea, look for that bracket, find a door I truly love and make this! And thank you for not painting the wood. This is perfection! Featuring you on Party Junk this weekend. 🙂
Thanks so much Donna! Never even considered painting this door, the wood is just so beautiful…just a little butcher block conditioner was all it needed.
And I’m so excited to be featured at your great party this weekend. Truly honored…Thanks so much. I’ll certainly be back once I find another something that needs my love and attention. On the lookout now.
Have a fantastic weekend.
Lynn
I found you at One Time Events party. So much better. Your desk was too small. Using this table isn’t only better for space but it is gorgeous. Super job.
Cindy
Thanks for stopping by Cindy. I 100% agree with you that my old desk was too small and my new desk is ‘just perfect’…to quote Little Red Riding Hood! BTW…love that old shutter you have in your home…perfect for seasonal decorations!
Have a great weekend,
Lynn
I absolutely love this – I’ve seen doors turned into desks all the time but this is fantastic! The best ever with that glass top. There are so many neat old doors out there in antique stores that could be revamped into desks. Great idea!
Hi Carole and thanks for your kind words! You’re right that you kind find all sorts of great doors with characters ‘out there’. I’m really tickled that I was able to use, and love how I used, the 2 that we found years ago. Since I don’t have anymore, looks like I need to go hunting again!
BTW…your site is beautiful and full of great information. So jealous that you live on a small farm…on my bucket list.
Hope your enjoy your weekend, Lynn
Thanks for the compliment on my blog, I enjoy it and life on the farm is pretty awesome. We’re getting things ready to sell in the spring so we can up our acreage and shrink our home size. I’ve been thinking about this desk idea all weekend so in my travels I’m on the look out for a vintage door. Hope you have a great week.
Hi Carole and you’re welcome. We’re planning on selling in the spring as well, but we’re hoping to shrink both house and yard for the time being. Good luck finding a door…I know there’s one out there with your name on it!
I so love this! I would love to make a cool desk for my son, this would be perfect. Sturdy and really cool. And there is so much room for computers or anything else you need at your fingertips!!! I’m jealous too, I have a desk but it’s half that size and not nearly so awesome!! Pinning!
Aw gee Thanks Nikki…you always make me feel so good. You are more than welcome to live in my guest room as long as you tell me how great I am all day long! Deal? This desk was so easy and relatively inexpensive…I’m sure your son would love it…head to a salvage store and rustle up a desk.
Lynn
This is fantastic! Thank you for sharing.
Thanks Erica, do love my door/desk!
Oh my what a GORGEOUS desk. Love the reclaimed look! Thanks so much for linking up at The DIY Collective!
Thanks Erica…I do love my very spacious desk. Such an improvement over the last one. It’s practically perfect in every way. So glad you stopped by .
Lynn
What an awesome project! I just love your new desk. You’ve inspired me … I’ve been storing two wooden legal size file cabinets that I’ve been meaning to float a door over for-EVER. Maybe now I’ll get busy. Thanks for sharing!
Hi Cynthia…I wish I had had those wooden file cabinets…that was my first idea. Think the door will be easier to find…check out your local salvage store. Good luck on it and I’d love to see it when you’re done.
Happy Thursday!
Hugs, Lynn
Looks like your canine Project Manager made sure it was a success!
She is my constant companion…and a pretty perfect one at that. Thanks for stopping by.
Lynn
Hi Lynn,
Where did you find the glass. That is the hardest part for me to find that is within my budget.
Holly
Hi Holly, I have got to be honest with you that that glass was not cheap. I found it at a local glass/window shop and it ran around $150…it’s a big desk and requires a big piece of glass. Good luck finding something more reasonable.
Lynn
Hi Lynn,
I am trying to accomplish this same task right now, but I am finding glass to be relatively expensive. Where did you get yours?
Hi Molly,
My glass was expensive as well…not sure that there is a way around that. I’ve had my desk for about 5 years now and did have to replace it once as something I had hanging on the wall fell and cracked the glass. That being said, we have moved since then and successfully moved the glass without any damage to it.
I did consider plexiglass, but it does yellow and scratch. So, I stuck with glass.
Good luck!
What a fun pantry door! As soon as I saw it, I wondered how I could make that work in my pantry… but the “pantry” is actually where a laundry room and coat closet and freezer storage area was when we bought the house. I’d need LOTS of doors! And, while MAYBE I could actually find doors… getting them installed by my husband would be the trickiest task. For example… when we used to live in WY and could buy Christmas trees from the USFS, we could get a floor to vaulted ceiling size tree. But getting it into the house required 4 or 5 guys to move it into place. So it sat outside until I couldn’t stand not having it in the house anymore. And so it goes with just about every project that I’m excited to get done… I can come up with ideas — or “find” them on someone’s blog (LOL), but different “importance/timing” radar systems here for completion. I had no idea that IKEA had those table bases, though – so thank you for that info! I’m still in the thinking process of what to do for our dining table…
Hi Cat…
Your hubby and mine seem to share the same ‘urgency’ timetable! 😂 Drives me crazy!